

Apple’s fifth era Time Capsule means that you can wirelessly again up your {hardware}. This is learn how to refurbish the mixed base station and NAS gadget.
Apple launched the Wi-Fi revolution in 1998 when it launched its first AirPort base station (entry level) and elective AirPort playing cards for brand new Macs and notebooks when the unique iMac was launched that yr.
Apple’s authentic Wi-Fi lineup included the primary iMac, PowerMac G3 tower, G3 iBook mannequin, and the skilled PowerBook G4. These fashions all used an elective AirPort card which may very well be added to them so as to add Wi-Fi capabilities.
Mainstream acceptance of the web was simply getting began again then, and Apple needed to see what consumer reception to wi-fi networking could be.
The general public liked Wi-Fi and AirPort and it’s nonetheless the ever-present wi-fi laptop networking normal at the moment.
That very same yr Apple launched its first AirPort base station – a “UFO” like mannequin with a spherical form, gray and clear plastic, and three easy LEDs on its entrance.
Two extra UFO-design fashions adopted, the third mannequin being dubbed the primary “AirPort Excessive” which featured a more recent, quicker Wi-Fi normal.
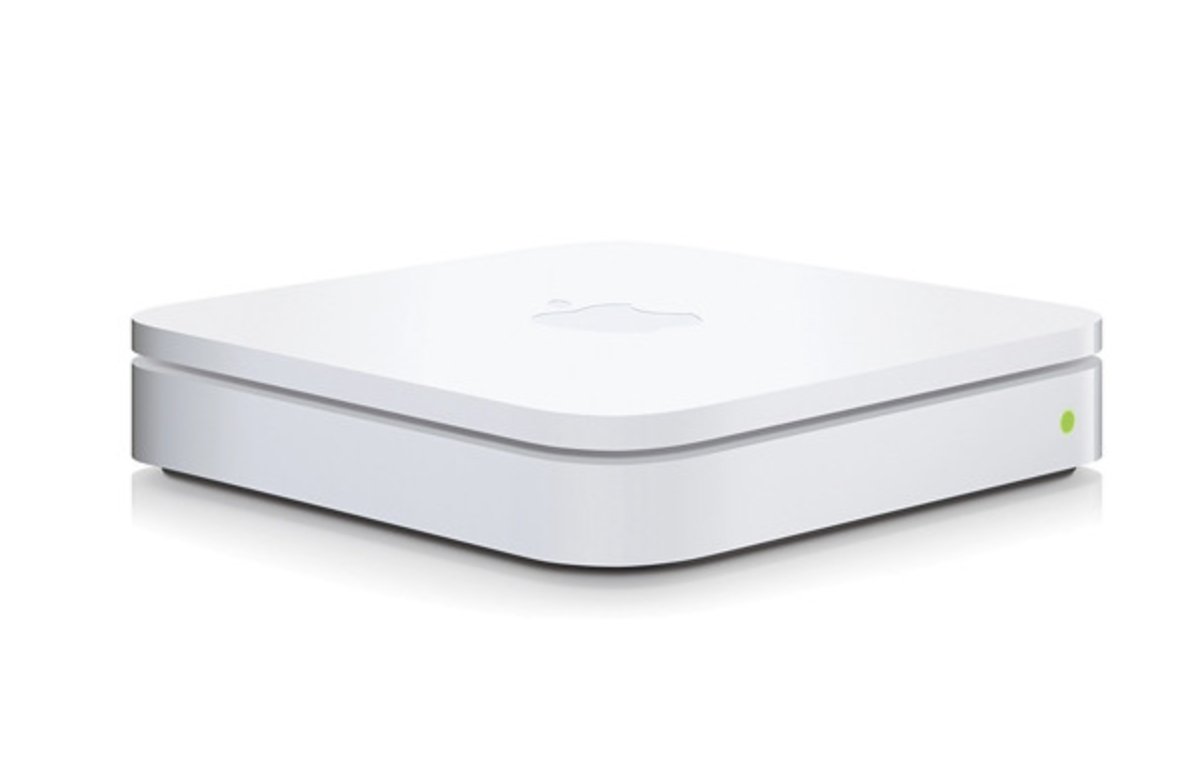
third era AirPort Excessive.
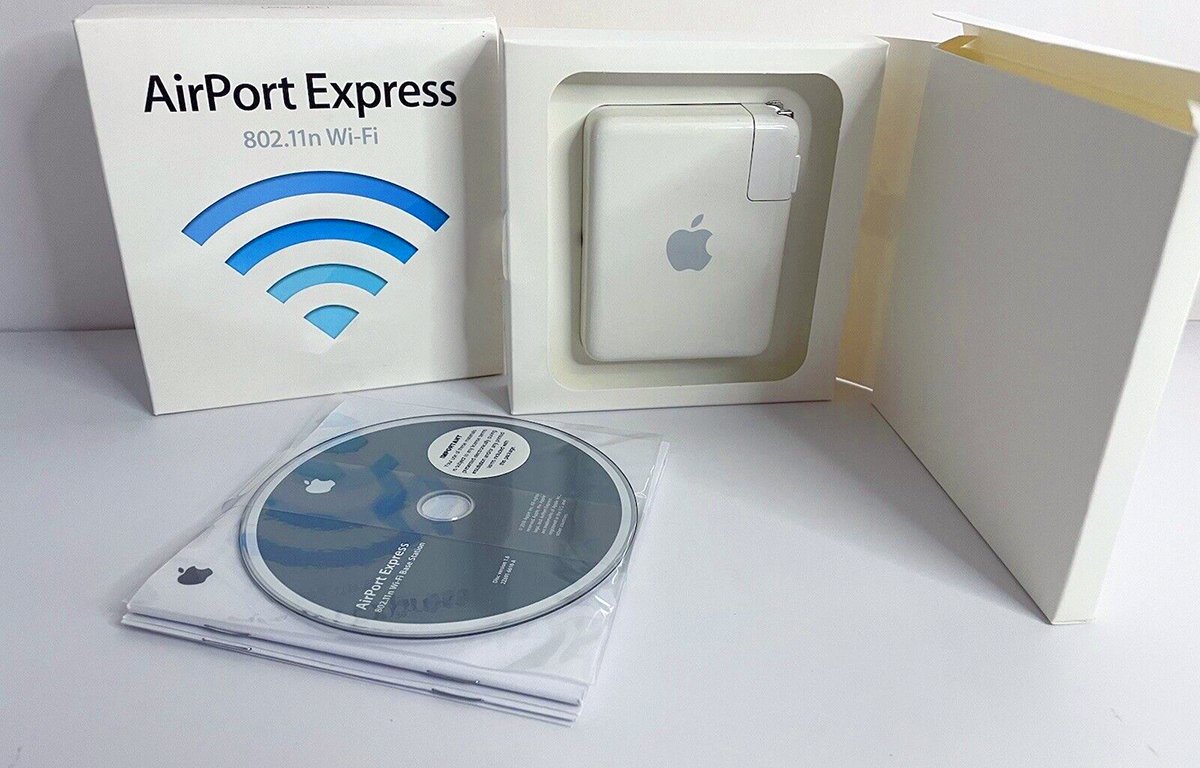
AirPort Specific and Excessive
The next yr Apple launched the primary of the compact AirPort Specific fashions. Its first design was a easy small white plastic field with a folding A/C energy plug on one finish, and Ethernet ports and a standing gentle on the opposite.
With AirPort Specific, you could possibly acquire a Wi-Fi entry level just by plugging it into any normal home outlet and a cable or DSL modem.
After AirPort Specific Apple launched a number of AirPort Excessive base stations with upgraded Wi-Fi and extra options equivalent to the power so as to add an exterior USB drive as a sharable community drive over wi-fi networks. You can additionally use AirPort Extremes as a bridge from a wi-fi community to units with out Wi-Fi functionality.
The unique AirPort Excessive fashions had a small sq. type issue much like a Mac mini, however with an all-white plastic case.
Time Capsule and Time Machine
In January of 2008, Apple launched the AirPort Time Capsule gadget. Primarily a mix of AirPort base station and network-attached storage (NAS) containing an inside arduous drive, Time Capsule allowed customers to do simple backups and use the Time Capsule as each a LAN gateway router and as a shared storage answer over networks.
Time Capsule additionally supplied a USB port for including an extra exterior USB drive for extra storage.
Together with the discharge of Mac OS X 10.5 Leopard in October 2007, Apple additionally launched a brand new app included with Mac OS X referred to as Time Machine, which nonetheless ships with macOS at the moment.
Time Machine means that you can add particular disks for backup, and when you’ve got one among Apple’s Time Capsule units to make use of that gadget because the goal gadget to your backups over a community.
Time Capsule fashions
Apple discontinued all Time Capsule gross sales in 2018, primarily as a result of there are inexpensive and extra available generic community backup options out there, and since Wi-Fi switches and routers are actually extraordinarily cheap.
Oddly, Apple’s web site nonetheless has the “Buy” page for the ultimate Time Capsule mannequin on-line, however you’ll be able to not buy new Time Capsule models from Apple.
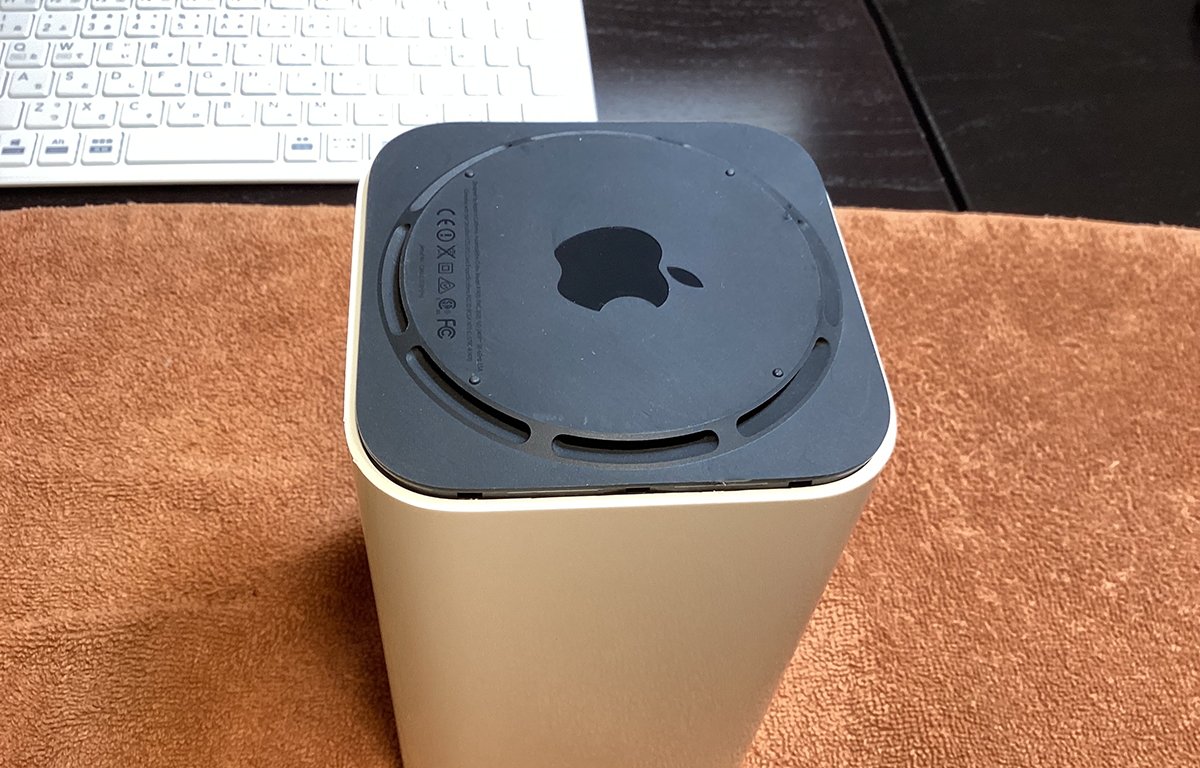
There have been 5 Time Capsule fashions in all – the primary 4 of which had the identical bodily type issue as the unique flat AirPort Excessive fashions, however the fifth mannequin (A1470) launched in 2013 had the identical taller “tower” type issue as the ultimate AirPort Excessive: a small white plastic tower with ports on the again and a single giant rubber foot on the underside for air circulation.
The fifth and last mannequin additionally moved the facility provide contained in the gadget – eliminating the necessity for an exterior AC to DC energy provide.
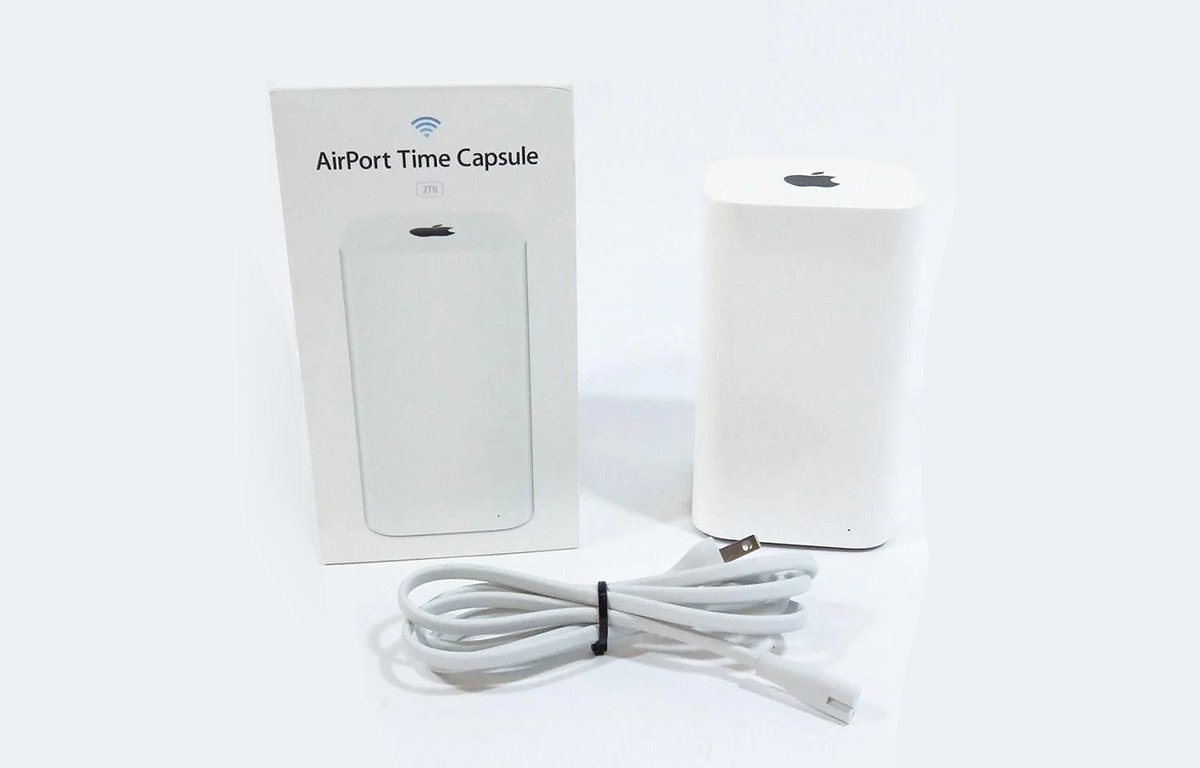
fifth era AirPort Time Capsule.
Many of the Time Capsule fashions had a full-sized 3.5″ SATA arduous drive, and the ultimate mannequin had a 3.5″ drive of both 2GB or 3GB capability for NAS.
All of the fashions supported Gigabit Ethernet, and the ultimate mannequin supported the 802.11ac Wi-Fi normal. All fashions of Time Capsule and AirPort Excessive, besides the very first fashions of each, supported each 2.4GHz and 5GHz community speeds.
All Time Capsule fashions have been based mostly on a Marvel 1850 CPU and quite a lot of both Marvell, Atheros, or Broadcom Wi-Fi chips. All had 128MB of RAM, 16MB of Flash storage, and a customized working system created by Apple.
The ultimate Time Capsule mannequin supported a most of fifty community customers directly.
Restoring a fifth era Time Capsule
On this article, we’ll present you learn how to refurbish a fifth era Time Capsule, and optionally change its inside 2GB or 3GB arduous drive, ought to yours fail.
One phrase of warning: this refurb is extraordinarily difficult. There are numerous tiny elements and cables which should be eliminated and reassembled.
Solely try this course of in case you are absolutely assured in your restore and laptop abilities. It is rather simple to wreck your Time Capsule and render it unusable if repairs should not accomplished completely.
For the restoration you’ll need:
- One fifth era AirPort Time Capsule
- Energy wire
- An Ethernet cable and an Ethernet swap or router
- Web connection
- Small multi-bit screwdriver set together with Torx bits
- A small flat-head screwdriver
- A plastic spudger instrument or skinny flat steel ruler
- A jeweler’s or photographer’s lupe for magnification
- A flashlight
- An electronics mat or small hand towel to put the unit on
- Compressed air or air compressor
- Apple’s AirPort Time Capsule Setup Information
If you wish to change the Time Capsule’s inside arduous drive additionally, you will want a 2TB or 3TB 3.5″ SATA arduous drive. You possibly can’t use a alternative SSD drive as a result of the Time Capsule makes use of a customized SATA drive board that solely suits 3.5″ SATA arduous drives.
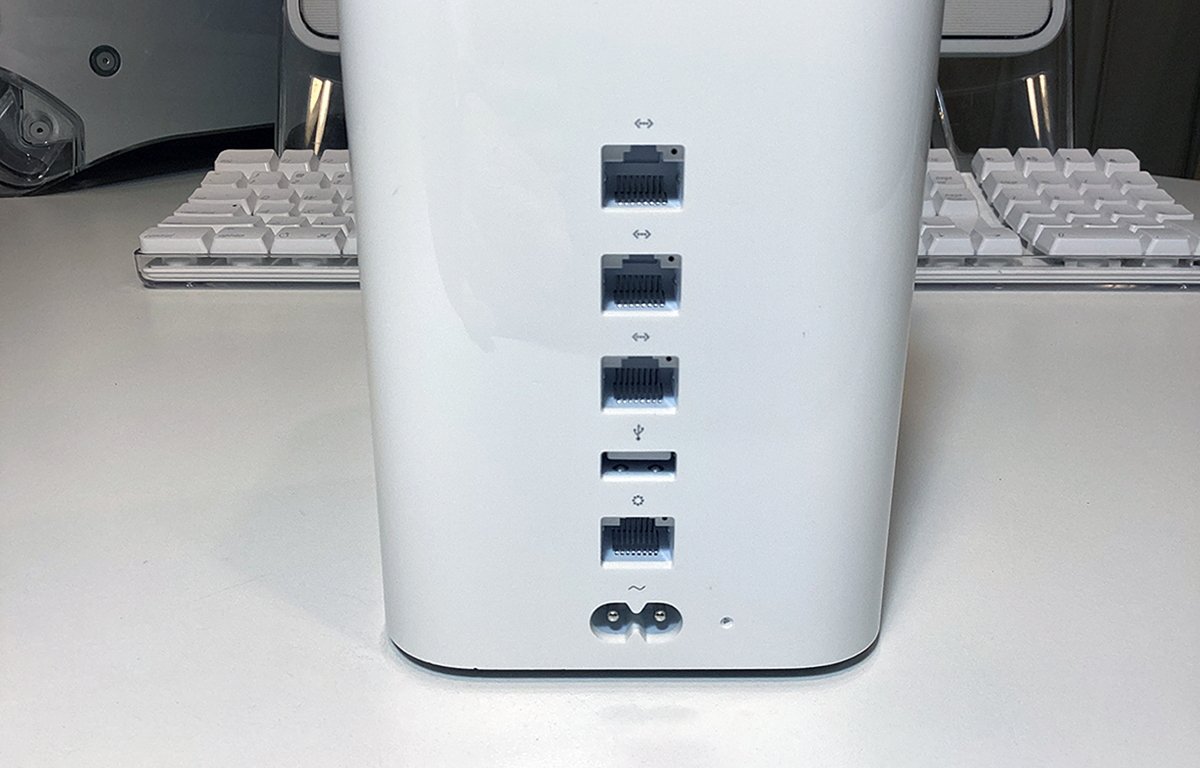
Time capsule rear ports. Observe the small reset button on the decrease proper.
Getting began
To get began, first flip your Time Capsule over and set it on an electronics mat or small hand towel on a flat floor. The underside needs to be going through up with the black backside cowl seen.
The underside cowl is fabricated from a mushy rubbery plastic and is held in by nothing however friction. There are small sq. openings all the way in which across the backside cowl which snap onto small plastic clips on the within of the unit’s important enclosure.
A phrase of warning: even for those who use all non-metallic instruments, it is possible there will probably be some minimal injury to the underside cowl, and sure one or two of the small clip holes. It’s because the tolerances between the duvet and the enclosure are extraordinarily tight.
If you do not need any injury in anyway to the underside cowl, do not try this restore.
Having mentioned that, the injury to the underside cowl will possible be hardly noticeable and it will not intervene with the unit’s operation or reassembly.
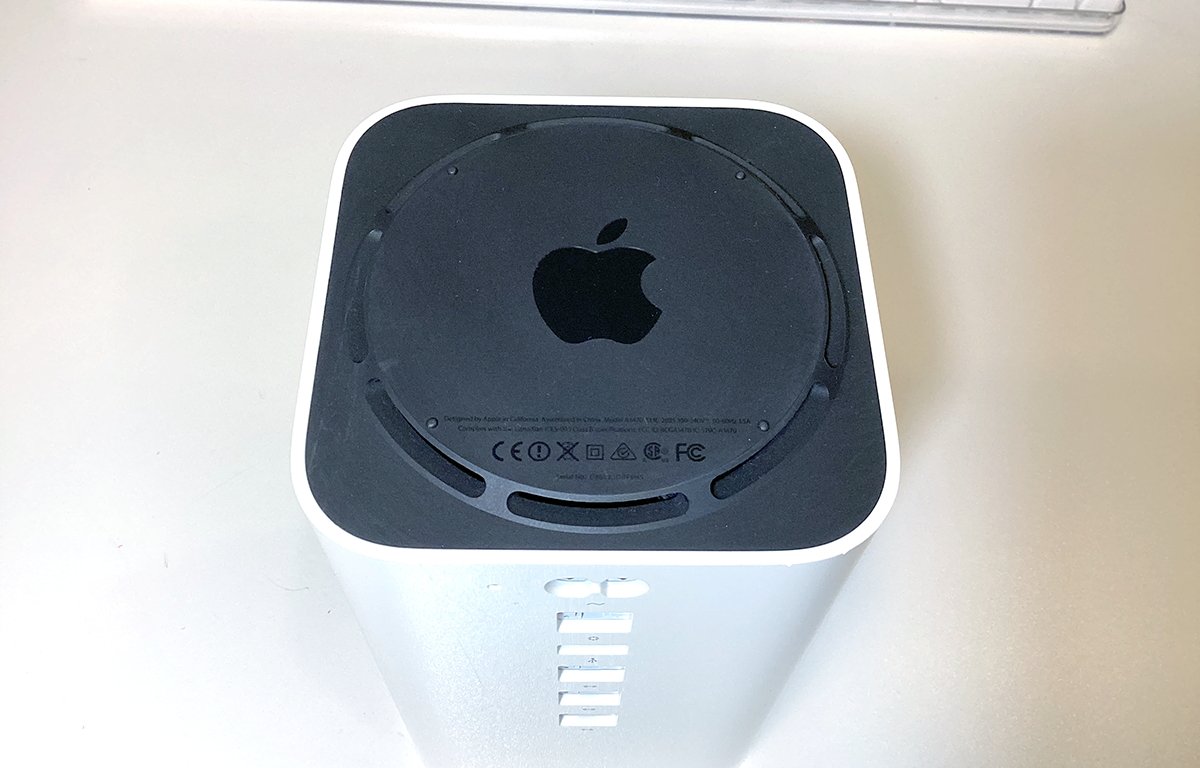
Time capsule backside cowl.
Take away the underside cowl
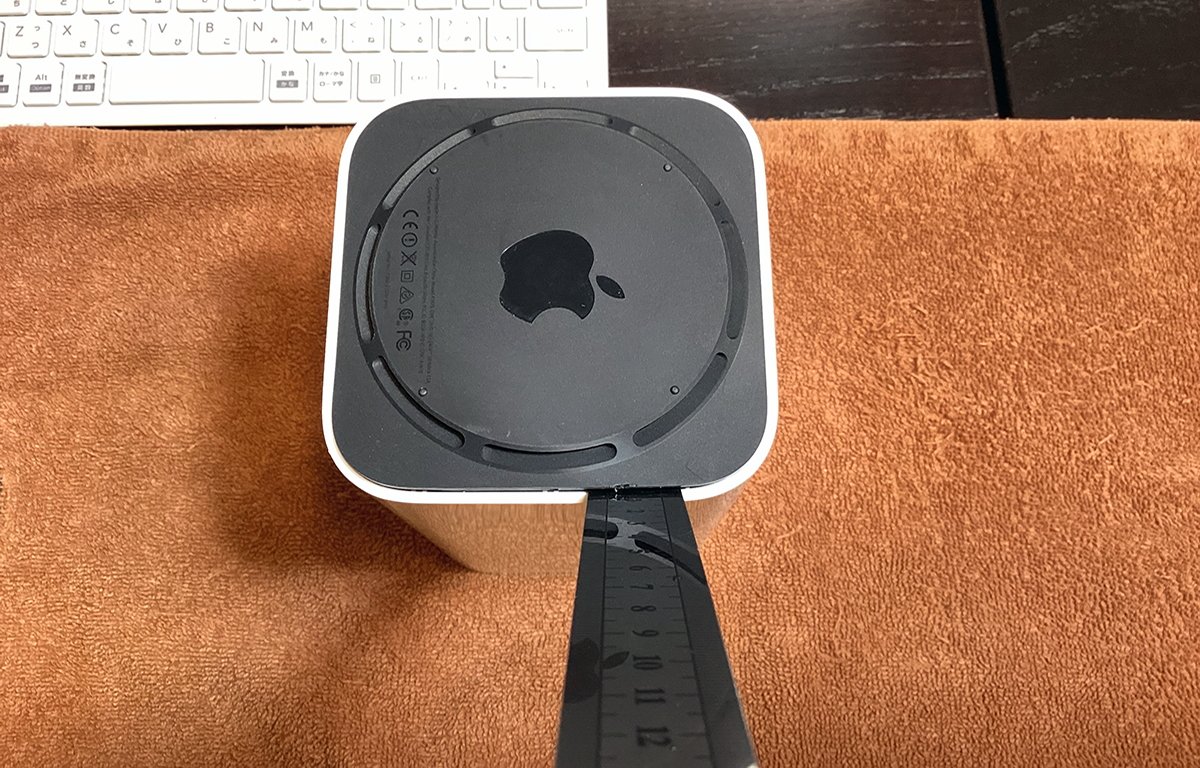
To take away the underside cowl from the unit, use both a really skinny plastic spudger, or a really skinny small steel ruler. A two-inch vast spackling knife may even work, and so will a steel guitar choose – though you could not be capable to get sufficient leverage with a choose.
Ranging from one aspect of the unit (not from the entrance or rear), insert the instrument into the seam between the duvet and the unit’s enclosure. You’ll have to wiggle it a bit to get it in.
As soon as inserted, gently pry down with the instrument, forcing one aspect of the duvet out of the enclosure. As soon as one aspect is free, insert a small flat-head screwdriver and really gently pry up one aspect of the duvet.
Start prying on the edges.
After you may have one aspect of the duvet pried up far sufficient to get a finger beneath its edge, use your fingers or a small screwdriver to pry the duvet off the unit totally.
Go sluggish and watch out. It’s possible you’ll wish to stroll the screwdriver, or your first instrument across the edges to free extra of the duvet earlier than eradicating it together with your fingers.
Do not pry or insert any instrument into the entrance or again edges of the gadget – there are wires and sensors in these areas and for those who insert a instrument there you will possible injury them.
Additionally observe that the within of the duvet has a small notch on one aspect. That is necessary as a result of the notch has to go over the facility port or the duvet will not match while you reinstall it.
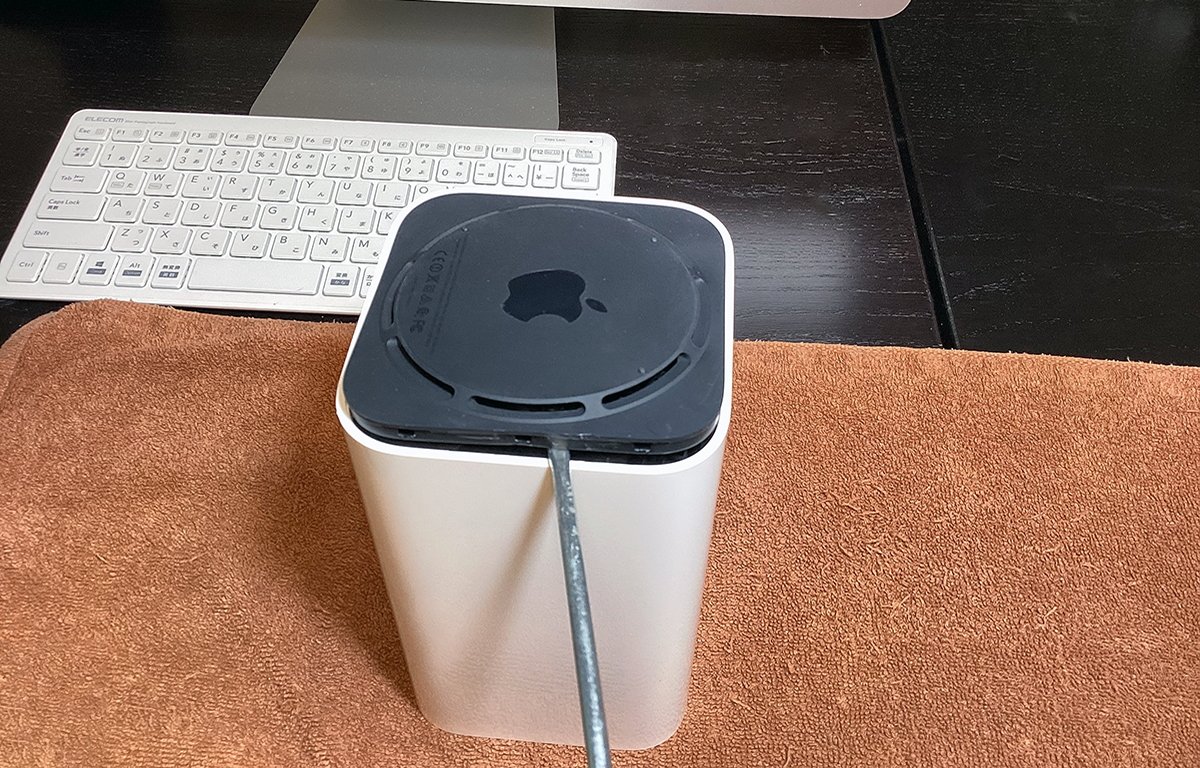
Pry the duvet off.
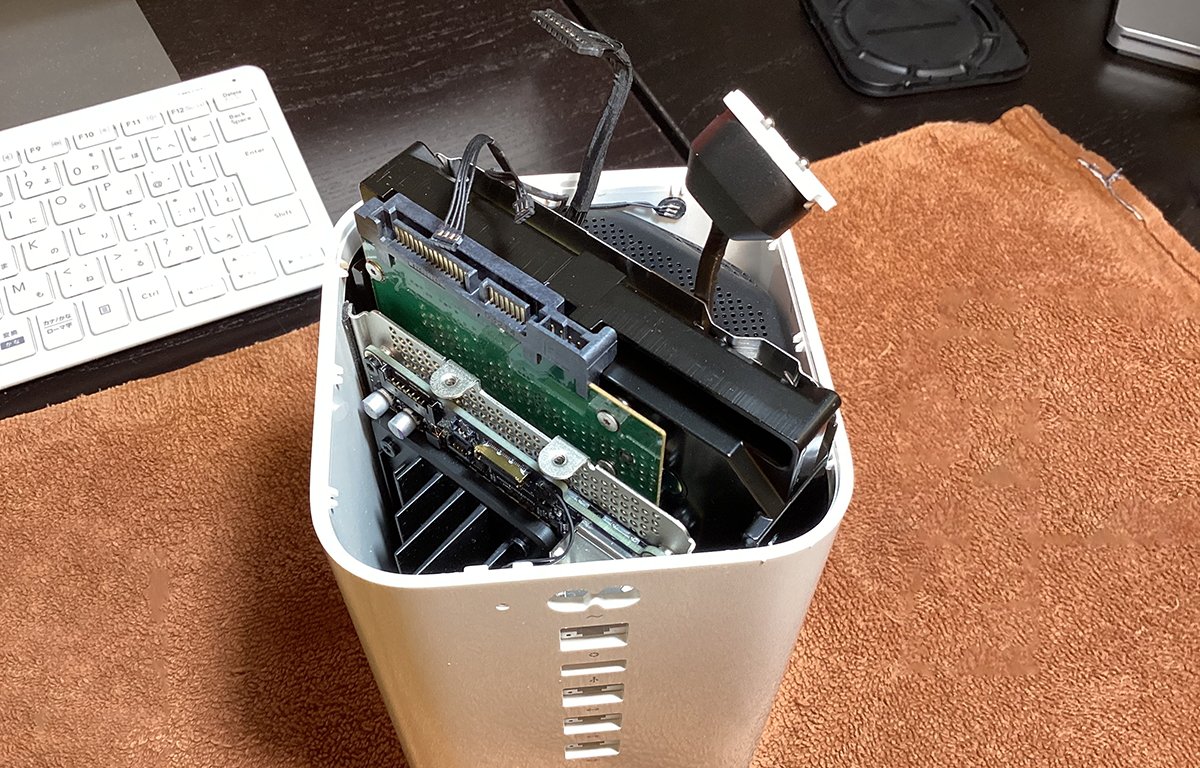
Inside elements
As soon as the underside cowl is eliminated, observe the primary elements of the Time Capsule:
- Small central warmth sink plate and 4 screws
- Small energy port on the high on the rear
- Giant warmth sink board on one aspect
- Energy provide cage on the other aspect
- Giant rubber shock absorber diagonally throughout the middle
- 4 small wires crossing over the shock absorber
- Small reset swap connector and wire subsequent to the facility port
- Customized motherboard beneath the massive warmth sink
The Time Capsule’s design is ingenious: the facility provide, warmth sink, and motherboard are on the perimeters, and the primary 3.5″ arduous drive is mounted within the middle diagonally beneath the primary shock absorber.
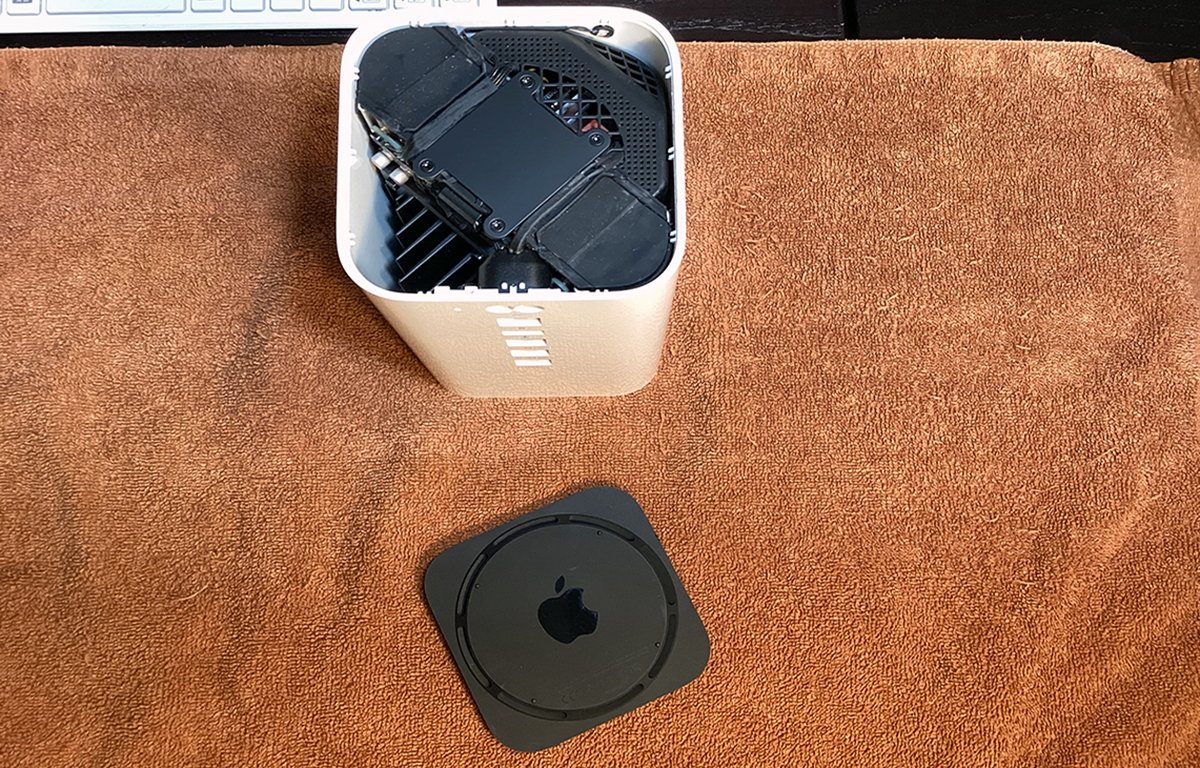
Backside cowl eliminated. Observe warmth sink in middle.
Beneath the arduous drive, however not seen from the highest whereas it’s put in are two extra smaller rubber shock absorbers on the opposite finish of the arduous drive – every held in by one giant screw and spring.
The facility provide additionally accommodates a virtually silent tiny fan, which is not seen from the skin or high. The fan solely comes on if the Time Capsule’s temperature rises above a sure threshold.
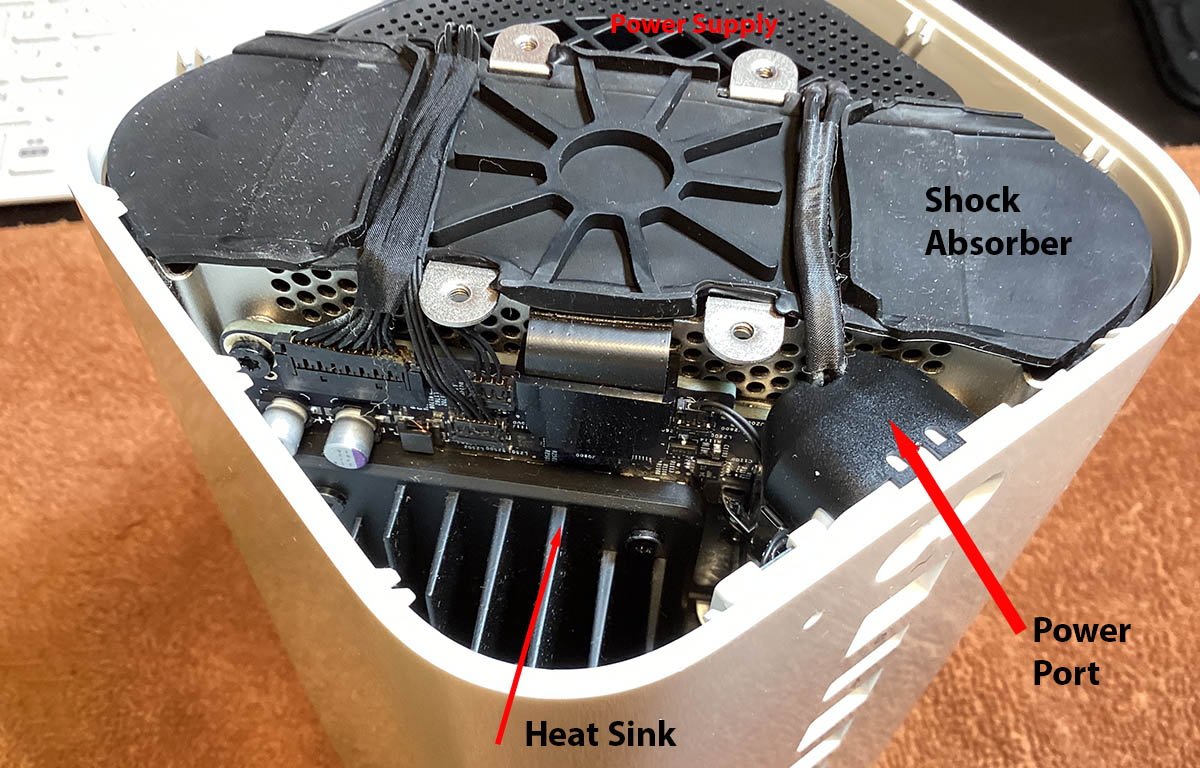
Time capsule inside elements.
Air circulates round either side of the unit, cooling each the facility provide and the arduous drive earlier than being despatched again out the underside openings within the backside cowl across the giant plastic foot.
As soon as the arduous drive is eliminated (which we’ll get to beneath), it’s potential to take away the whole inside meeting from the outer enclosure, however until your Time Capsule is extraordinarily filthy inside, we do not suggest it.
It’s because there are six small antennae wires on the underside (usually the highest when upright) of the unit and while you take away the inner meeting you danger loosening or damaging the antennae wires.
Until your gadget has some failed half on the motherboard that wants changing, there is no actual must take away the primary meeting from the unit.
In case your unit is that broken, it might simply be simpler to purchase one other alternative off eBay or different on-line shops since they often value beneath $50 as of this writing.
Additionally remember that for those who do take away the arduous drive from the unit, the 2 rubber shock absorbers on the backside of the drive can simply come unfastened and it is extraordinarily irritating to should put them again in place. At a minimal, you will want a pair of lengthy needle-nose pliers to maneuver them again into place beneath their screws.
Clear every part
Utilizing compressed air or an air compressor, blast any mud and dust out of the unit. Most mud will accumulate inside the facility provide cage, and on the primary warmth sink.
In case you are eradicating the inner drive, additionally clear beneath it with compressed air earlier than you reinstall it or change it.
Generally, your Time Capsule should not be too soiled because the fan virtually by no means activates – until you reside in a high-dust space or in a really humid space.
Should you do stay in a really humid local weather it is possible mould can have fashioned contained in the unit, by which case it would be best to take away the primary meeting and wash the whole enclosure and backside cowl in water and dry them completely.
Disassembly
As soon as every part has been cleaned, you’ll be able to start disassembly.
Start by eradicating the small steel warmth sink and 4 Torx screws in the midst of the unit. Set them apart.
Subsequent, you will must loosen the facility port connector and the three small cables on the left aspect of the motherboard.
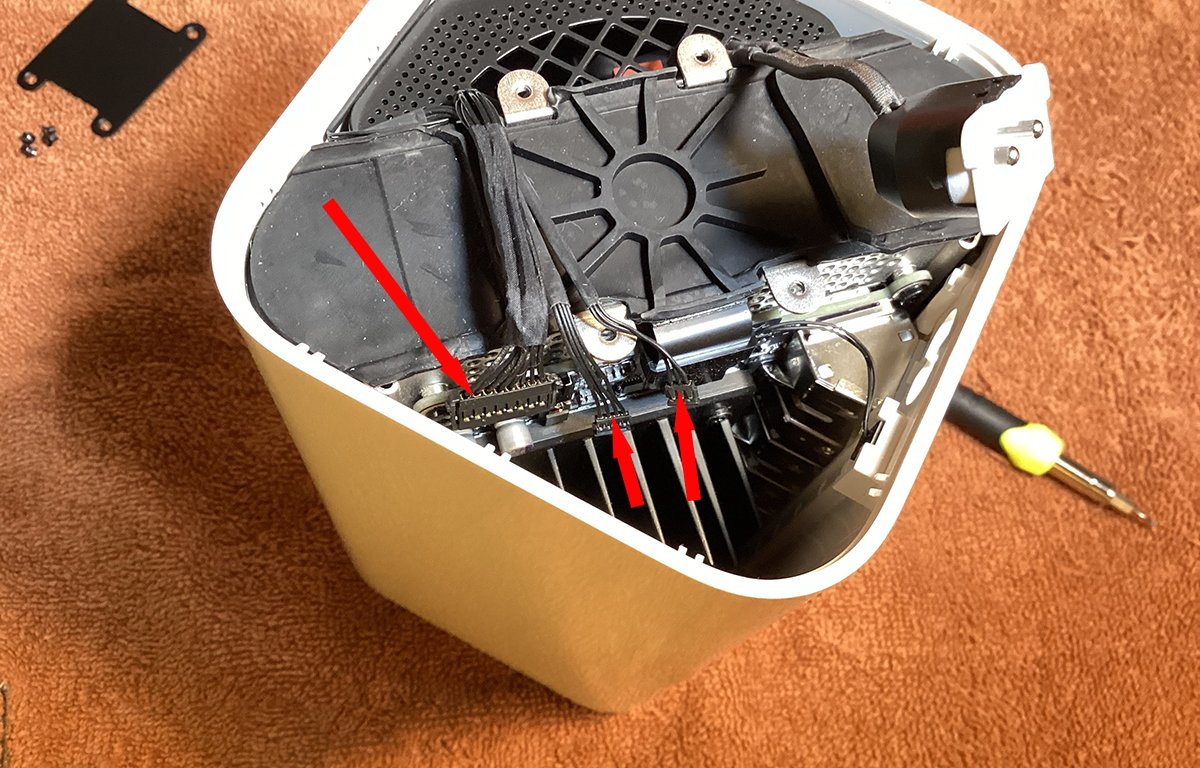
Disconnect the three small wires.
The facility port is not held in by something – it merely sits in place held in by two small plastic grooves on the within of the enclosure.
To take away it from its place, merely press up from beneath it with a plastic instrument to slip it out of place. It can nonetheless be linked to its small cable.
The opposite three small cables are on the other aspect. To take away the bigger of the three, very gently place a plastic instrument beneath its wires, and press up.
Do not use an excessive amount of power because the connector for the cable could be very small and the plastic is straightforward to wreck.
It’s possible you’ll wish to examine all three connectors with a flashlight and lupe first to know how they match collectively.
The remaining two tiny connectors maintain small wires onto the motherboard.
Observe these connectors don’t disconnect by pulling them straight up as you would possibly anticipate. As an alternative, they arrive unfastened by prying them ahead – from beneath.
To take action insert a small plastic instrument beneath the wires on the base of the connector and press forwards, away from the motherboard. You may really feel a slight click on as they arrive free.
Now that every one 4 cables are free, you’ll be able to take away the primary rubber shock absorber by prying it up at each ends.
The shock absorber is held in with friction by 4 small white clips at both finish of the enclosure. As soon as it is free you’ll be able to take away it.
This exposes the three.5″ inside drive, its SATA connector, and the highest of the motherboard.
Take away the shock absorber.
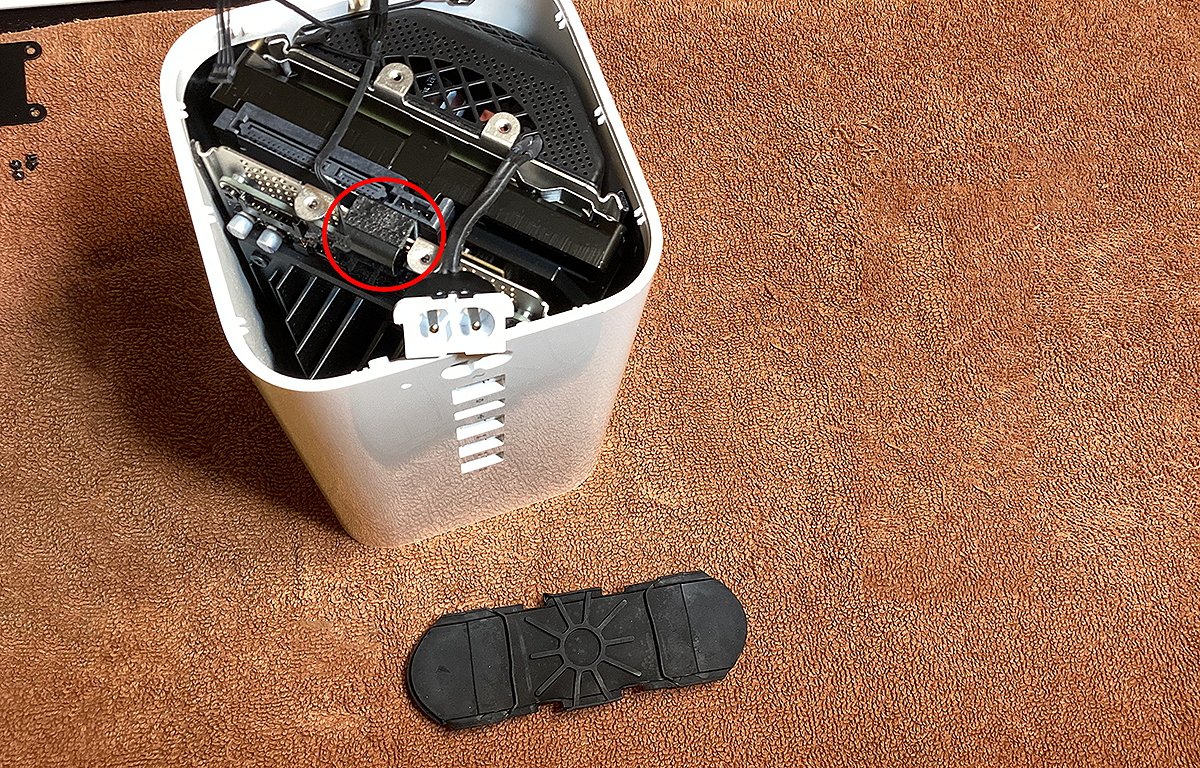
Take away the SATA connector
You solely want to do that step for those who’re eradicating the arduous drive.
To take away the drive’s SATA connector, first observe that there’s a small black sq. collar-like clip over it.
The clip works in another way than you would possibly anticipate: as a substitute of it attaching to the motherboard on its face, the clip slides over the cable finish of the SATA connector and clips over the sting of the motherboard.
The motherboard finish of the SATA connector is a tiny multi-pin connector that merely presses in place on the motherboard. Nothing else holds it in besides the plastic clip.
On the drive finish of the SATA connector, is a tiny board with the 2 drive connectors. It merely snaps onto the again of the drive.
As soon as you’ve got eliminated the SATA connector’s clip and motherboard connector, you’ll be able to merely elevate it off the tip of the drive and set it apart.
SATA connector eliminated. Motherboard finish is on the left.
Remember to use solely plastic instruments on the SATA connector – its cable is a mix of steel and a particular coating and for those who use steel instruments on it you’ll be able to simply injury the cable portion of the connector.
Generally, you should not want to make use of any instruments in any respect on the SATA connector.
Take away the arduous drive
As soon as the SATA connector is free from the drive, you’ll be able to take away the arduous drive. To take action merely elevate up on its edges together with your fingers and pull it straight up and out of the enclosure.
There’s nothing else apart from the 2 decrease rubber shock absorbers holding the drive in place so it ought to come out with out an excessive amount of power. If both of the decrease shock absorbers develop into dislodged from their place you will must reinsert them with a needle nostril pliers.
Pull straight up on the arduous drive to take away it.
Clear and set up new arduous drive
If there’s any remaining mud on the backside of the arduous drive bay, take away it with compressed air.
In case you are putting in a brand new alternative drive, set up it in reverse order, simply as you eliminated the unique drive.
One factor to notice whereas the unique arduous drive is eliminated is a rounded steel body round it. Observe the place the perimeters of the body are and its basic form.
Whenever you go to reinstall the primary shock absorber over the brand new arduous drive, its edges have to suit totally inside this steel body or else the underside cowl will not match on the unit tightly and a spot will probably be left across the cowl’s edges.
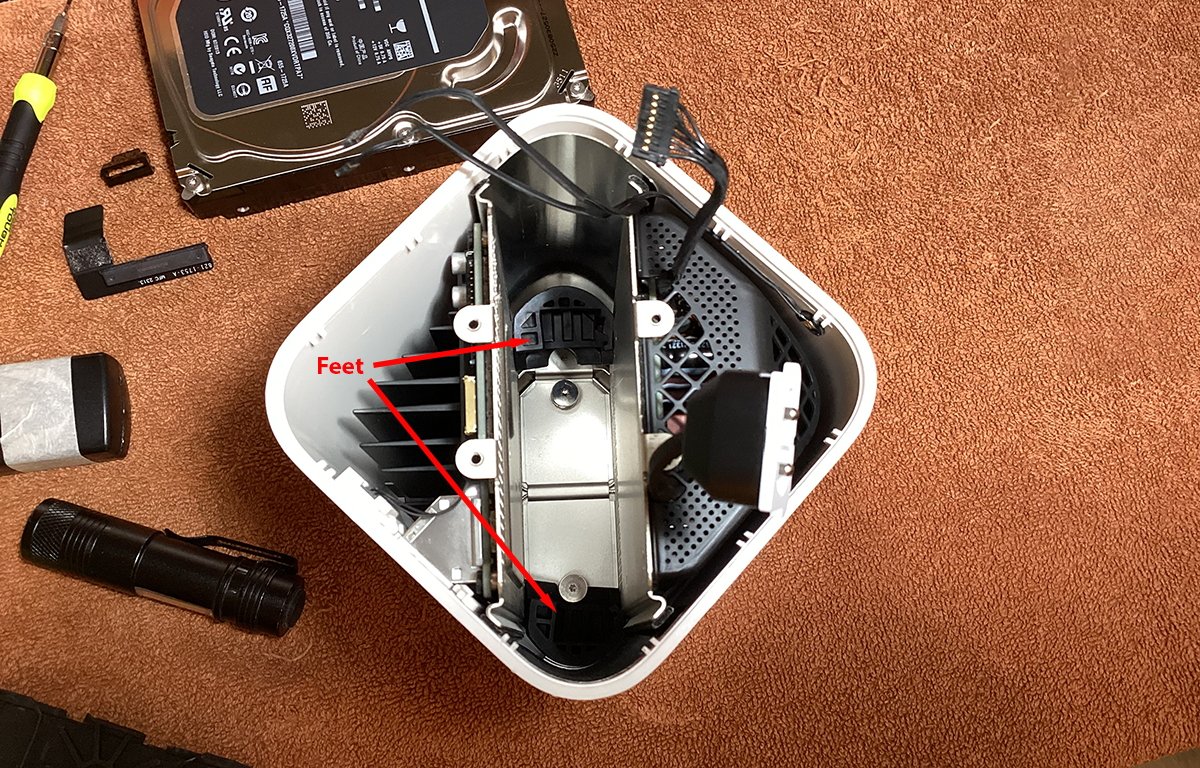
Onerous drive rubber toes.
Reinstall in reverse order
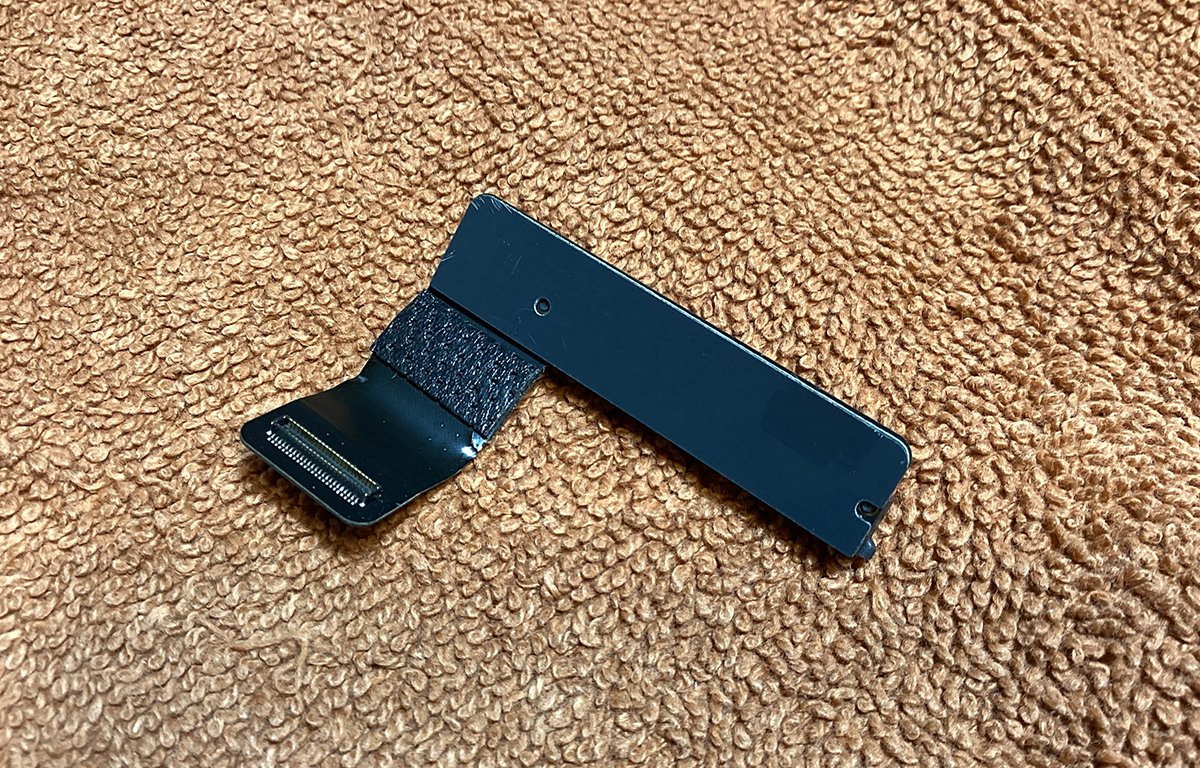
As soon as the brand new arduous drive is put in, subsequent you will reconnect the SATA cable.
Place the plastic collar clip over the motherboard finish of the cable, slide it ahead, and whereas holding it in place snap the drive finish of the cable onto the brand new arduous drive.
As soon as hooked up to the drive, reconnect the motherboard finish of the SATA cable by urgent its connector down and in place on the motherboard. As soon as each ends of the cable are linked, snap the plastic clip collar down onto the sting of the motherboard till you are feeling a click on.
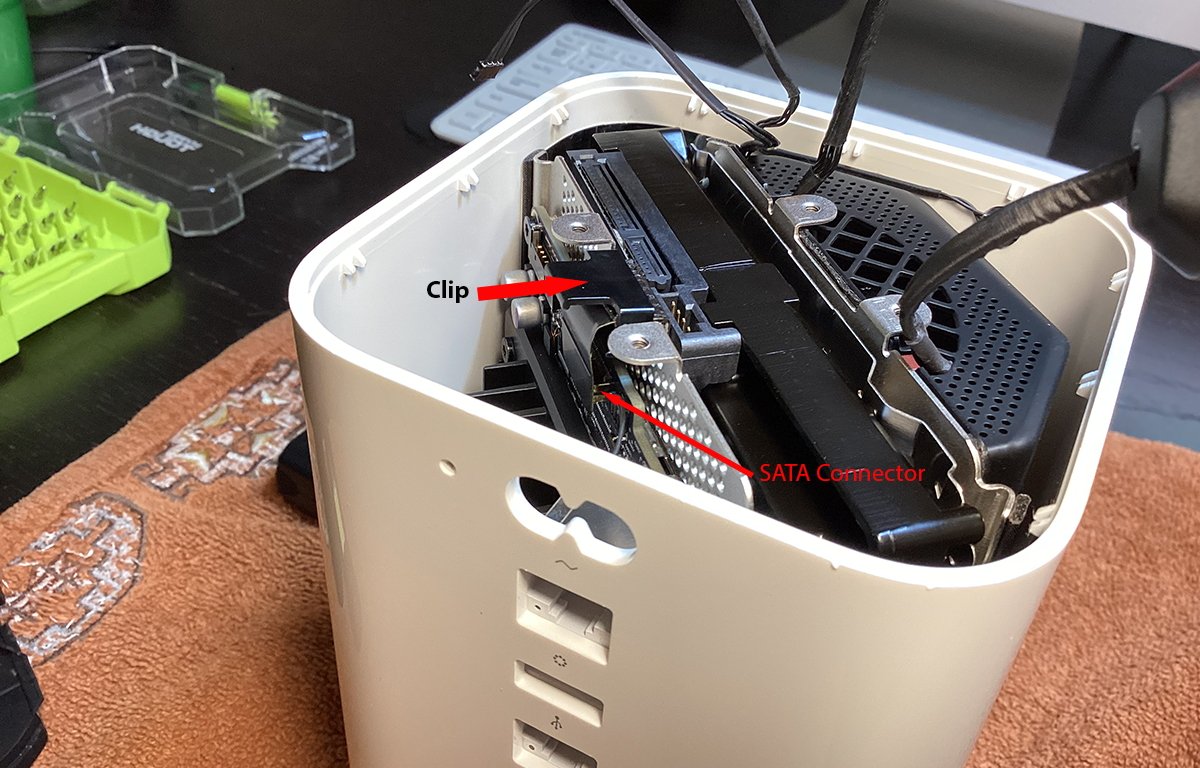
SATA connector with clip.
Reinstall the rubber shock absorber by beginning at one finish, urgent it down beneath the 2 small white plastic clips on the within of the enclosure, and urgent the identical finish down into the steel body guaranteeing the shock absorber’s edges are absolutely contained in the steel body.
Subsequent do the identical for the opposite aspect of the shock absorber till it’s absolutely seated contained in the arduous drive’s steel body and on high of the arduous drive.
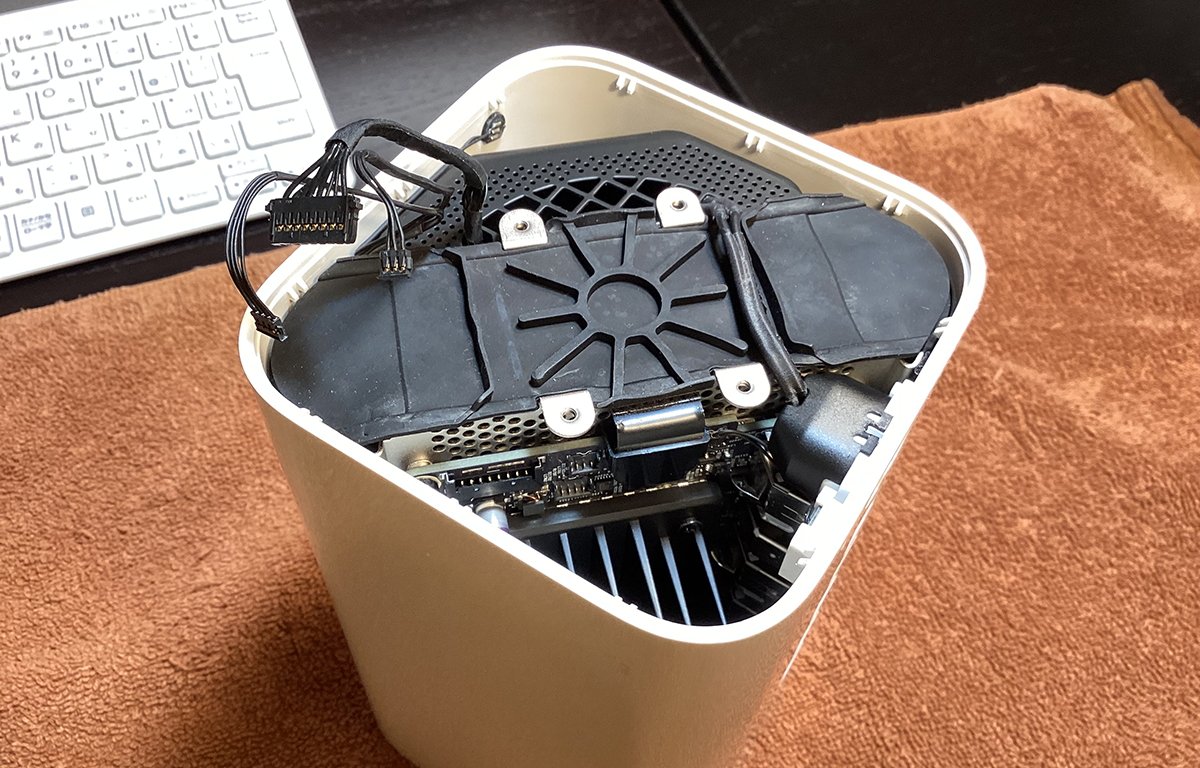
Shock absorber reinstalled. Make certain the perimeters are seated.
Reconnect wires
Now that the shock absorber is reinstalled, reconnect the three small wires you eliminated at the beginning onto the motherboard.
Begin with the smallest of the three wires and gently press it straight down onto the motherboard together with your finger. You may really feel a really slight click on because it snaps in place.
Do the identical for the subsequent smallest wire, then lastly snap the biggest of the three wires into its socket on the left aspect of the motherboard.
Verify all wire connections to verify they’re in place.
Lastly, fold the facility port’s wire again excessive of the shock absorber and slide it down into place in its opening on the within of the enclosure.
Fast check
Earlier than you reinstall the underside cowl, and with the unit nonetheless the wrong way up, plug the Time Capsule’s Ethernet cable into its WAN port, and the opposite finish into an Ethernet swap or router in your community.
Now plug within the energy wire.
If every part works as anticipated, it’s best to see the tiny LED on the entrance of the Time Capsule go inexperienced first, then swap to a flashing amber colour.
If the standing LED flashes amber in a short time it means there is a {hardware} error. In that case, you will must recheck all of your cable connections and ensure every part is linked correctly.
Reset
Subsequent, reset the Time Capsule to its manufacturing facility settings by first unplugging it, then urgent and holding the small recessed reset button on the rear of the unit subsequent to the facility port.
You may want to carry the reset button in utilizing a thumbtack or bent paper clip for six seconds whereas plugging the facility again in. The standing LED on the entrance of the Time Capsule will flash briefly – beginning inexperienced, then slowly flashing amber as soon as reset takes impact.
As soon as the six seconds is up, launch the reset button.
The entrance panel standing gentle ought to now both flash inexperienced, or flash amber – however slowly, not shortly.
This means the gadget has been reset and is able to be arrange utilizing the Apple AirPort Utility.
It might be simpler to make use of an influence strip when reapplying the facility as holding the reset button and plugging the wire in on the similar time could also be troublesome with two fingers.
As soon as the gadget is powered on, plug it right into a wired LAN by connecting an Ethernet cable to the underside WAN port on the gadget. That is the port with a spherical icon subsequent to it.
Erase new drive
Should you put in a brand new arduous drive in your Time Capsule you will subsequent must run macOS’s AirPort Utility situated in your Startup Disk at /Purposes/Utilities/Airport Utility.
Double-click AirPort Utility in Finder to run it.
Should you did a full {hardware} reset of your Time Capsule utilizing the Reset button, you will must set it up utilizing the subsequent part first. After you do this, come again right here to arrange its inside disk, in any other case proceed from right here.
When AirPort Utility opens, wait a couple of seconds for the Time Capsule to point out up within the checklist of Airport Units. Choose it, then click on the Edit button within the popover that seems subsequent to the Time Capsule.
Subsequent, click on the Disks tab in the primary window.
Within the Disks pane, you will see an inventory of drives hooked up to the gadget together with the inner drive. Choose it by clicking it, then click on the Erase Disk button beneath it.
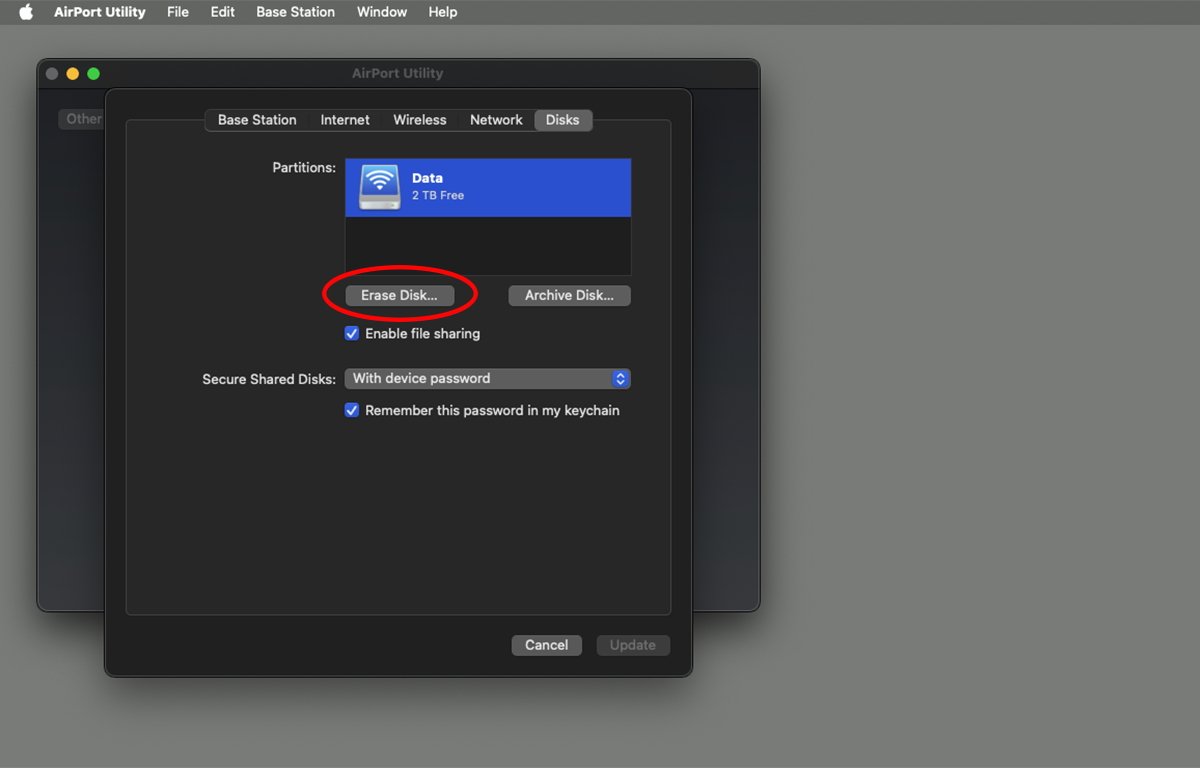
Erase the disk.
Enter a brand new identify for the drive, then click on the Erase button. You may get a warning sheet subsequent asking in case you are positive you wish to erase the drive.
Click on the Proceed button and AirPort Utility will erase the drive and set up a brand new filesystem onto it.
You may as well click on the Shared Disk checkbox within the Erase pane earlier than erasing to allow networked file sharing on the brand new drive when the erase completes.
Whereas the disk is being erased, the standing gentle will blink amber. When the erase completes, the standing gentle will flip again to stable inexperienced, and its indicator gentle within the Apple AirPort utility also needs to go inexperienced.
The restore and improve is now full.
Time Capsule preliminary arrange
Should you did a {hardware} reset utilizing the Reset button in your Time Capsule, subsequent you will must run Apple’s AirPort Utility to set it up.
Run macOS’s AirPort Utility situated in your Startup Disk at /Purposes/Utilities/Airport Utility.
Should you see your Time Capsule within the checklist of units in your community, choose it. Should you do not see your Time Capsule listed, click on the Different Wi-Fi Units button within the higher left nook of the primary window.
Whenever you do you will see an inventory of acknowledged Airport Units in your community that AirPort Utility can arrange. From the gadget checklist choose your Time Capsule.
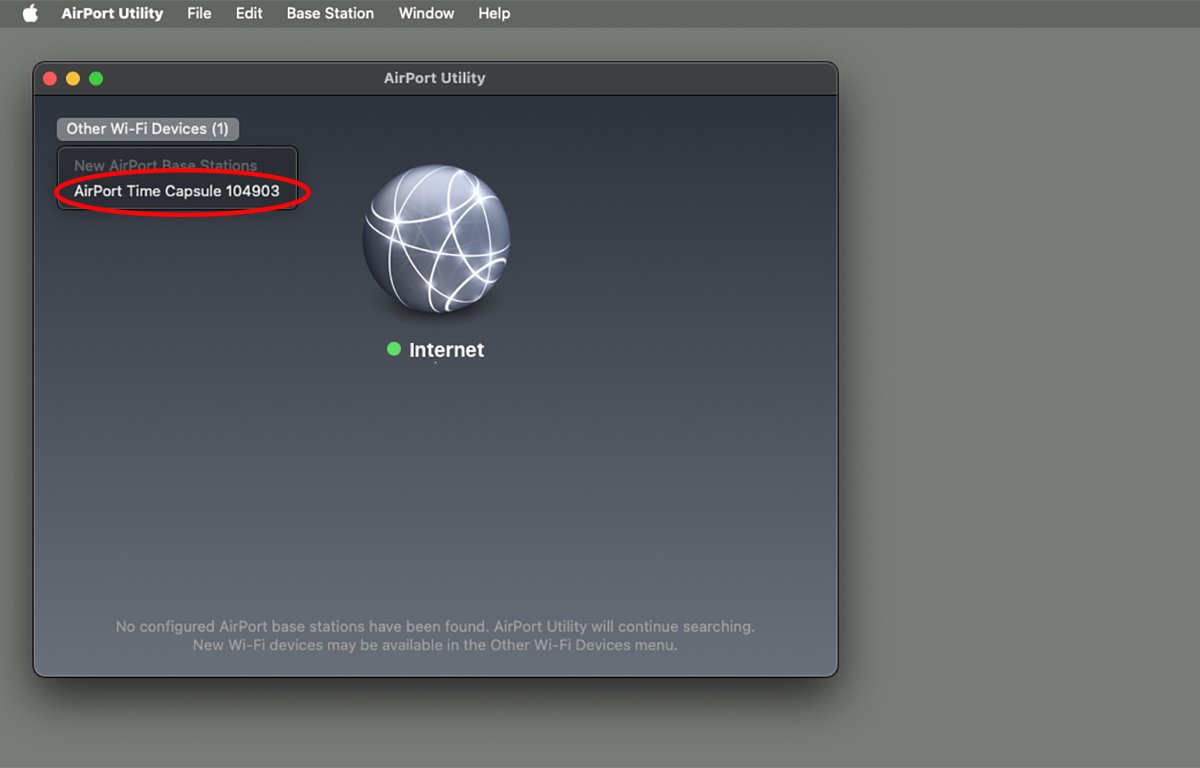
Choose your Time Capsule gadget.
AirPort Utility will probe your LAN and the Time Capsule you chose and try to affix your Mac’s default community. As soon as linked, AirPort Utility will show a setup sheet titled “This AirPort Time Capsule will create a community”.
Select learn how to arrange your Time Capsule.
It does this as a result of bear in mind – Time Capsule units are additionally AirPort base station units – so AirPort Utility assumes you additionally wish to arrange the Time Capsule as a Wi-Fi community entry level.
Should you do not wish to do that, click on the button Different Choices within the decrease left nook. This causes the setup sheet to alter to a sheet asking you the way you wish to use your Time Capsule.
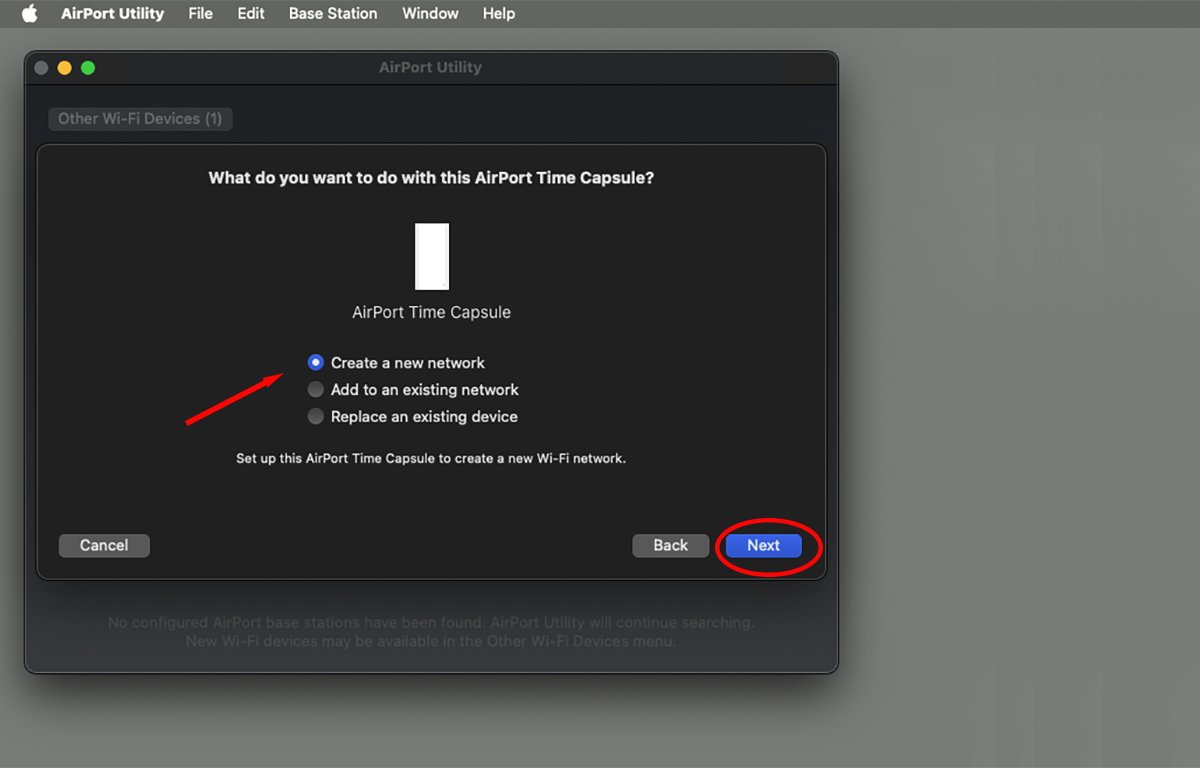
When organising, you get three decisions:
- Create a brand new community
- Add to an present community
- Exchange an present gadget
If you wish to create a completely new Wi-Fi community, with a novel identify and password, choose the primary choice. This allows you to arrange the Time Capsule as an AirPort Wi-FI entry level very similar to you’d within the default setup.
If you wish to use the Time Capsule solely for backup or as a NAS drive solely, then choose the second choice. This units up the Time Capsule as a networked backup drive, however not as a Wi-Fi entry level.
The third choice means that you can switch settings from an present AirPort or Time Capsule gadget in your community, and use the brand new Time Capsule as a alternative gadget for the unique gadget.
Until you wish to create a brand new Wi-Fi community or subnet in your present community, or until you wish to change an outdated gadget, you often need the second choice.
If you choose the second choice and full the setup, the Time Capsule will be part of an present LAN as if it have been a bridge or router, or as a shared NAS gadget. You need to use the primary choice to create a brand new community, for instance, to isolate a bunch of customers to solely this gadget or any units it bridges to – as a substitute of giving these customers entry to your whole community.
Most often, you’ll solely wish to use the primary choice if the Time Capsule goes for use as a community linked on to your cable or DSL modem. For subnetworks or to make use of the Time Capsule as a Time Machine backup gadget or shared disk, select the second choice.
At any fee, choosing both the primary or second choice means that you can specify a community identify, a base station identify, and a community password for customers to make use of after they log in.
Enter the brand new community data within the Airport Utility setup sheet and click on Subsequent.
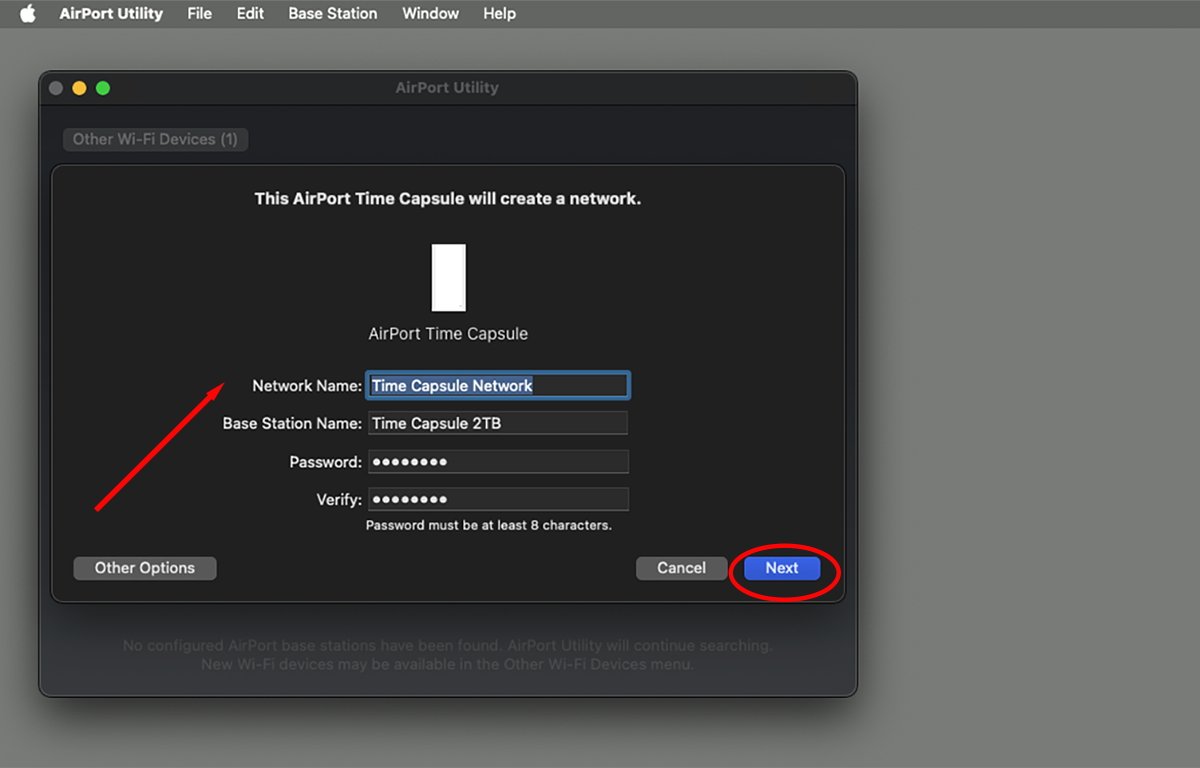
Enter a community identify and base station identify. Click on “Subsequent”.
Subsequent, you will be requested whether or not you wish to ship AirPort Analytics to Apple or not. Select Ship or Do not ship. Click on Subsequent.
If every part completes, Airport Utility shows “Time Capsule Community” is now out there. Setup full”. Click on Carried out.
At this level, the Time Capsule is now in your community and wi-fi customers can hook up with it by choosing the community you simply created and logging into the gadget.
AirPort Utility ought to show the brand new Time Capsule in its important window.
If the gadget wants a firmware replace, and an web connection is accessible, Airport Utility will show an alert asking you if you wish to replace the firmware. Click on Replace.
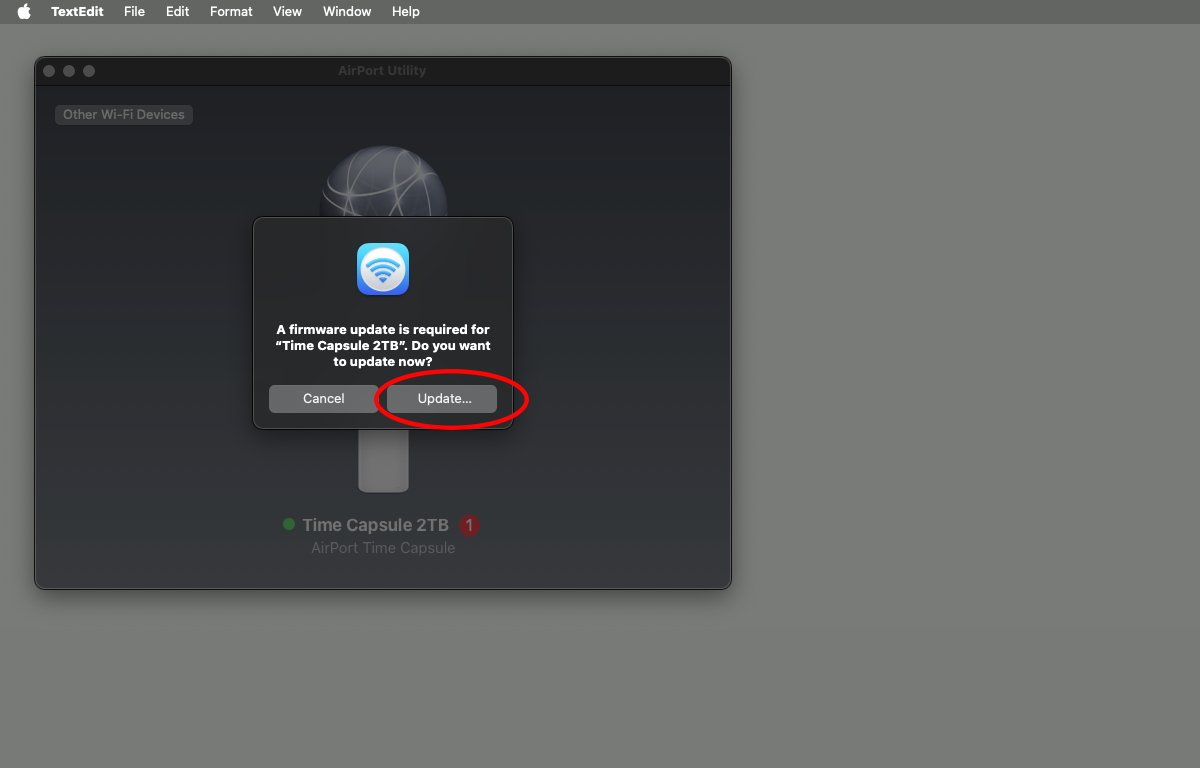
Replace the firmware, if wanted.
AirPort Utility will obtain, put together, and start updating the Time Capsule’s firmware. This will take a couple of minutes. Do not flip the facility off to the gadget in the course of the replace.
When the replace completes, the Time Capsule will restart routinely. You need to see the standing gentle go amber, then inexperienced after restart.
If every part labored as anticipated, it’s best to now see your Time Capsule listed as a tool linked to the web in AirPort Utility:
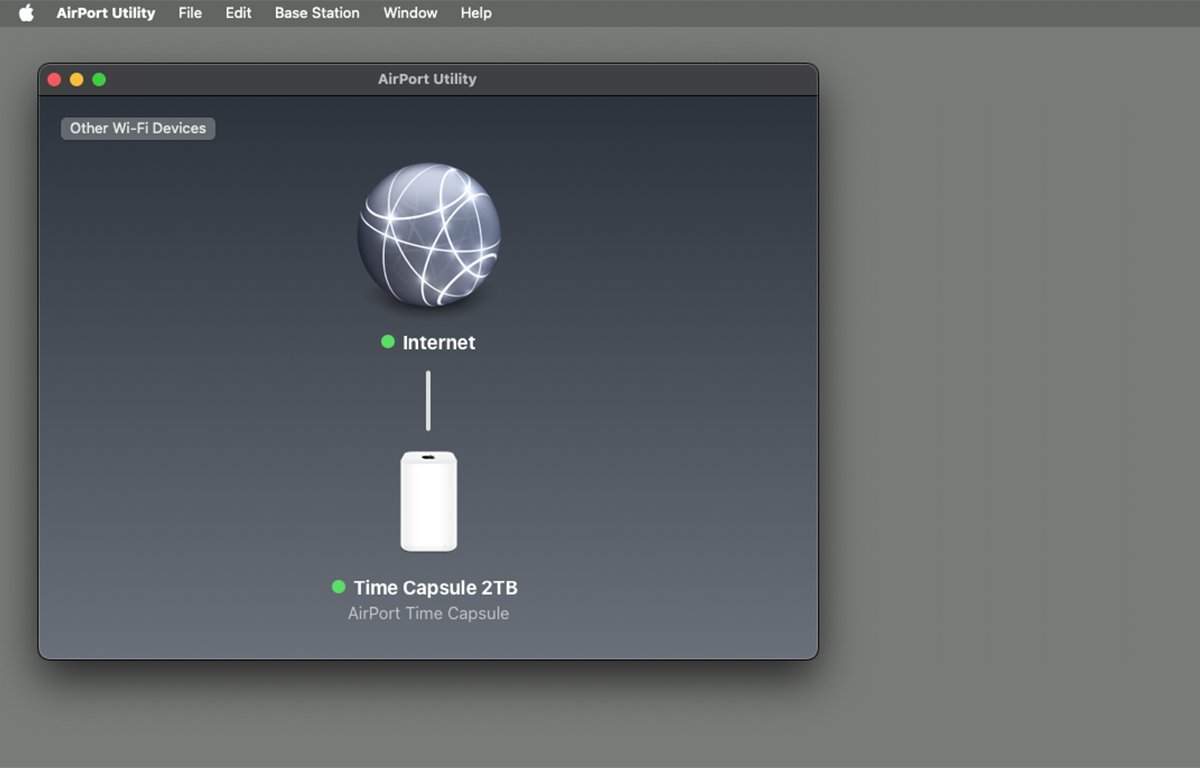
Setup full.
Should you click on the Time Capsule in AirPort Utility, it should show a popover with connection particulars, serial quantity, model quantity, and an Edit button. To arrange the Time Capsule’s inside arduous drive as a shared disk, click on Edit, then proceed to the earlier part titled “Erase new drive”.
Finder entry
If every part went in line with plan, and you have turned on File Sharing within the macOS System Settings app, it’s best to see your Time Capsule seem within the Finder window sidebars beneath the “Community” part.
To make use of the shared disk within the Time Capsule as a NAS drive, single-click Community in a Finder window’s sidebar. Whenever you do, you will see your Time Capsule seem within the Finder window together with different community units.
To entry your Time Capsule within the Finder window, double-click it. It can join – for those who set a shared drive password when formatting or reformatting the Time Capsule’s inside arduous drive, enter it now in Finder when prompted.
After you enter a password if required, the Time Capsule’s shared disk will mount within the Finder window as a shared folder:
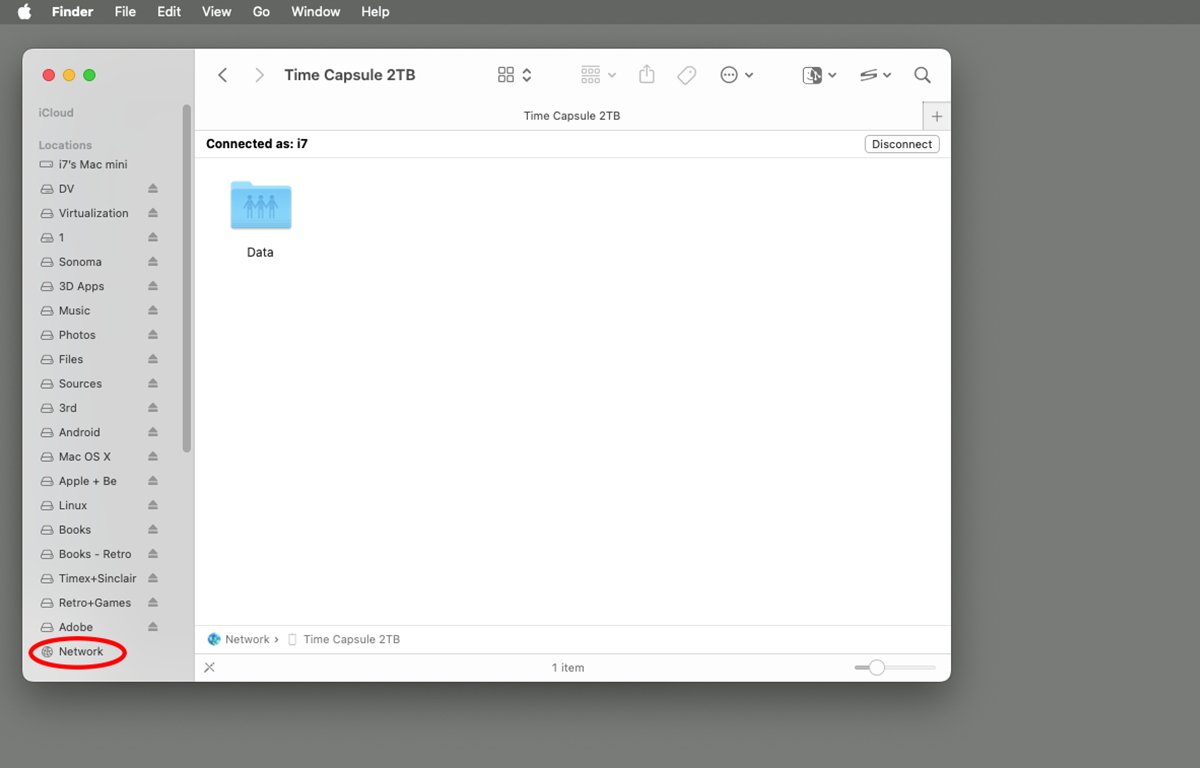
Connecting to your new Time Capsule.
Double-click the shared folder icon to entry the Time Capsule’s shared drive. Now you can entry the drive simply as if it was every other networked drive in your Mac.
You possibly can entry the Time Capsule in the identical means in Finder by choosing Go->Connect with Server from the Finder’s menu bar on the high of the show, then clicking the Browse button within the Connect with Server window.
Whenever you do, you will see the identical shared folder icon within the Finder’s “Community” window. Double-clicking the shared folder mounts the Time Capsule’s shared drive on the Finder’s Desktop simply as it could every other networked drive.
Last step
Now that your Time Capsule is absolutely refurbished – and all of the software program and firmware have been restored and arrange, it is time for the ultimate step: changing the underside cowl on the gadget.
To take action, set the duvet on the underside of the gadget in its authentic orientation, then whereas standing over the gadget, give the underside cowl one agency stable push on either side with the palms of your fingers. This can firmly seat the duvet again in its authentic place.
Put together to reseat the duvet.
There needs to be no seams or gaps on any aspect of the duvet. If there are, you will should take away it once more, verify that the shock absorber is seated correctly and that there are not any protruding wires or connectors, and shut the underside cowl the identical means once more.
Observe that the notch within the cowl for the facility port should be on the proper aspect or else the duvet will not shut correctly.
Time Capsules are nonetheless nice units for organising small native NAS models in your LAN to share recordsdata between computer systems, do community backups, and retailer recordsdata you utilize typically.
Though these units are actually virtually a decade outdated or extra, they’re nonetheless helpful – and their low value on the used market makes them much more enticing.
It’s possible you’ll wish to add an exterior USB disk to your Time Capsule as 2TB or 3TB today could also be insufficient for some makes use of, however even with out an exterior disk, they’re nonetheless very helpful.
In future articles, we’ll have a look at learn how to do community backups in your LAN utilizing a Time Capsule – with and with out Apple’s Time Machine app.


