
Drawback Assertion: Legacy Entrance-Finish Purposes On-Premises Structure
At the moment, numerous front-end applications are constructed and deployed utilizing on-prem Docker Kubernetes container photographs, that are hosted on internet servers (Apache/NGINX/IIS, and so forth.)
The issue with this strategy is that the workload container cluster should run continuously, which will increase the compute and replication value, infrastructure upkeep, and lack of restoration.

Resolution: Trendy Entrance Finish Purposes Azure Cloud Blob Storage Structure
Trendy static front-end functions are migrating to the cloud, and the place right here, the Azure blob storage is cheaper in computing and infrastructure({hardware} + Networking) prices.
We carried out a price estimation evaluation of Azure Blob vs. on-prem container for round 300+ front-end functions. As a enterprise outcome, 40% value financial savings on infrastructure in Azure blob cloud storage. This strategy doesn’t want digital machine containers/clusters, internet servers, and value per utilization.
Azure Storage Account Creation
A storage account is an Azure Useful resource Supervisor useful resource. Useful resource Supervisor is the deployment and administration service for Azure. For extra info, see Azure Resource Manager overview.
Each Useful resource Supervisor useful resource, together with an Azure storage account, should belong to an Azure useful resource group. A useful resource group is a logical container for grouping your Azure providers. While you create a storage account, you’ve got the choice to both create a brand new useful resource group or use an current useful resource group. This how-to reveals tips on how to create a brand new useful resource group.
To create an Azure storage account with the Azure portal, observe these steps:
1. From the left portal menu, choose Storage Accounts to show a listing of your storage accounts. If the portal menu is not seen, choose the menu button to toggle it on.

2. On the Storage accounts web page, choose Create.

3. On the Fundamentals tab, present the important info on your storage account. After you full the Fundamentals tab, you’ll be able to select to customise your new storage account additional by setting choices on the opposite tabs, or you’ll be able to choose Overview + Create to just accept the default choices and proceed to validate and create the account.

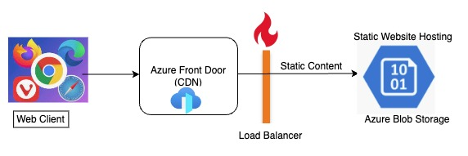
Host Static Web site in Azure Blob Storage
Azure storage static web sites are a characteristic that lets you host static web site content material (HTML, CSS, JavaScript, and picture information) immediately from a storage container named $internet. This can be a nice choice for situations for client-side rendering web sites the place you do not want an online server to render content material.
Let’s do a walkthrough to allow the static web site and add the static web site in $internet container blob storage.
Allow Static Web site Internet hosting
Static web site internet hosting is a characteristic that you have to allow on the storage account.
- Sign up to the Azure portal to get began.
- Find your storage account and choose it to show the account’s Overview pane.
- Within the Overview pane, choose the Capabilities tab. Subsequent, choose Static Web site to show the configuration web page for the static web site.

4. Choose Enabled to allow static web site internet hosting for the storage account.
5. Within the Index doc title discipline, specify a default index web page (For instance: index.html). The default index web page is displayed when a consumer navigates to the basis of your static web site.
6. Within the Error doc path discipline, specify a default error web page (For instance, 404.html). The default error web page is displayed when a consumer makes an attempt to navigate to a web page that doesn’t exist in your static web site.
7. Click on Save to complete the static website configuration.
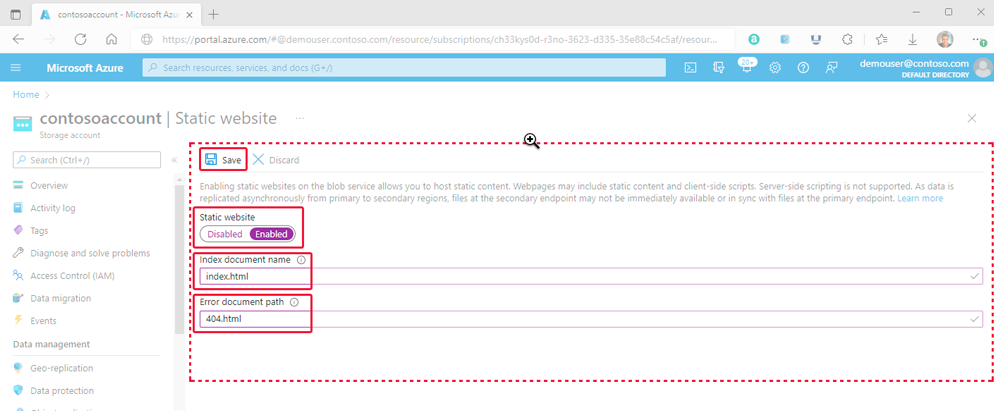
8. A affirmation message is displayed. Your static web site endpoints and different configuration info are proven inside the Overview pane.

Add Static Web site
The next directions present you tips on how to add information by utilizing the Azure portal. You can additionally use AzCopy, PowerShell, CLI, or any customized functions, such because the Jenkin pipeline, that may add information to the $internet container of your account. For a step-by-step tutorial that uploads information by utilizing Visible Studio code, see Tutorial: Host a static website on Blob Storage.
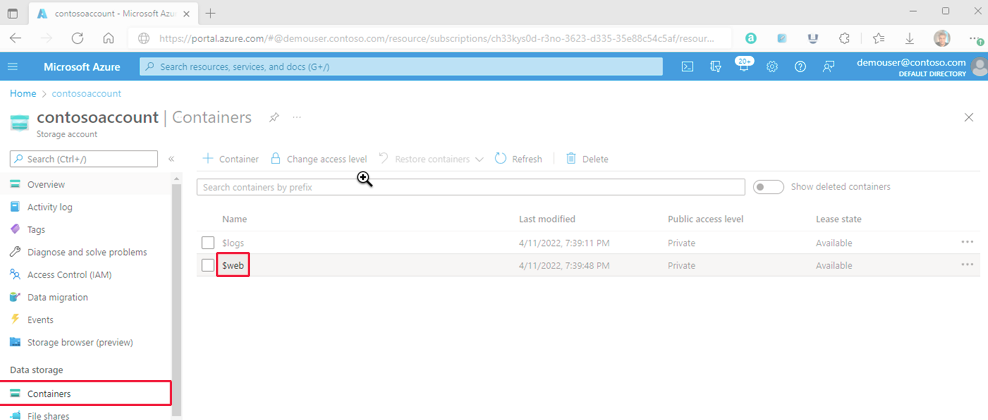
- Within the Azure portal, navigate to the storage account containing your static web site. Choose Containers within the left navigation pane to show the checklist of containers.
- Within the Containers pane, choose the $internet container to open the container’s Overview pane.
3. Within the Overview pane, choose the Add icon to open the Add blob pane. Subsequent, choose the Recordsdata discipline inside the Add blob pane to open the file browser. Navigate to the file you wish to add, choose it, after which choose Open to populate the Recordsdata discipline. Optionally, choose the Overwrite checkbox if information exist already.
Right here, you’ll be able to add as information or a whole static web site folder.
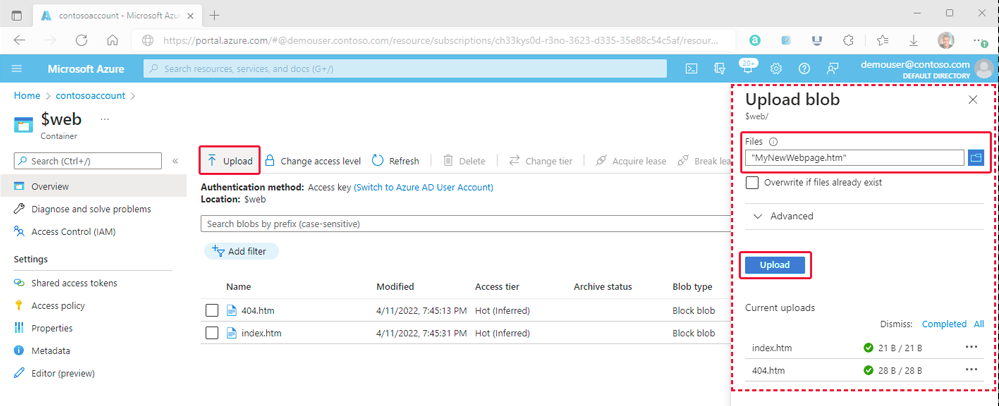
4. Should you intend for the browser to show the contents of the file, make it possible for the content material sort of that file is ready to textual content/html. To confirm this, choose the title of the blob you uploaded within the earlier step to open its Overview pane. Make sure that the worth is ready inside the CONTENT-TYPE property discipline.

Discover the Web site URL
You’ll be able to view the pages of your website from a browser by utilizing the general public URL of the web site.
To Improve safety, you’ll be able to apply the Personal hyperlink to the general public URL of the web site to safe the community connection.
Within the pane that seems beside the account overview web page of your storage account, choose Static Web site. The URL of your website seems within the Major endpoint discipline.

Ideally, we will’t expose the Azure major endpoint as a public web site URL; utilizing the corporate area internet server can configure the rewrite logic to entry the Azure major/personal endpoint URL.
** We are able to’t configure the http/https headers by Azure blob storage. Azure CDN/Entrance door helps this case.
Azure Entrance Door
To configure the online server headers’ functionality, akin to preflight CORS, setting cache-expiry, content-type, access-control-origin, and safety headers by the Azure entrance door.
- Within the Azure portal, select a storage account, choose the sort “Azure Entrance Door,” and create a profile.
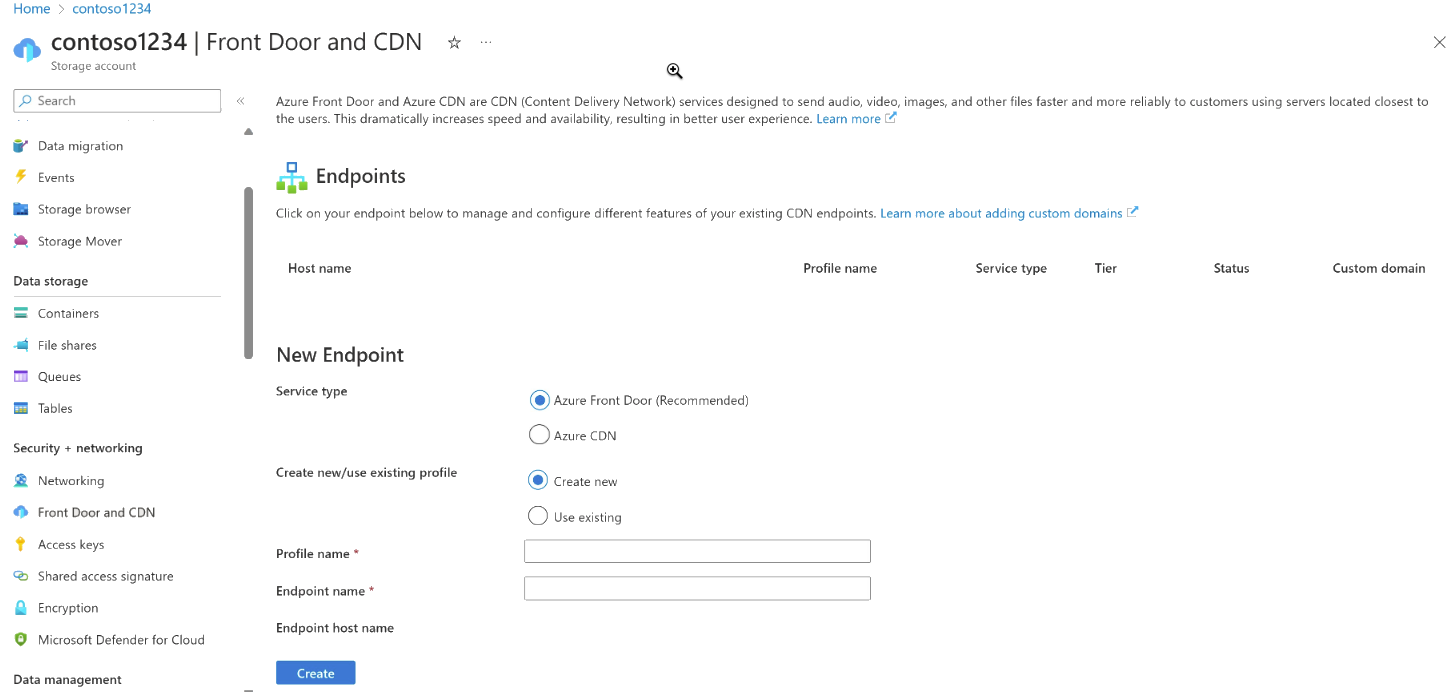
2. Add path to the entrance door profile.

3. Add safety coverage to the entrance door area

4. To deploy the Azure Entrance Door profile, choose Overview + Create after which Create. The configurations propagate to all edge areas in a couple of minutes.
Conclusion
In conclusion, that is an in-depth information to assist create storage accounts and static web sites utilizing the $internet blob container and entry static by Azure Entrance door (CDN) providers. Should you like this information and wish to know extra about Azure blob storage by static web site and Azure entrance door providers, you’ll be able to go to the official documentation pages beneath.


