
Apple’s Time Capsule base station put a Wi-Fi entry level, a community router, and a backup drive that tied into Time Machine all in a single field. That was its downfall, too: if the drive failed or grew to become corrupted, you had comparatively few choices. Apple stopped promoting Time Capsule gadgets in 2018, and lots of readers nonetheless miss them.
You may simulate a Time Capsule when you have a desktop Mac that’s all the time on and has a sturdy community connection. Just a few asides:
- You can use network-attached storage (NAS), however not all NAS methods assist Time Machine. I’ve additionally heard many tales of inconsistent efficiency.
- Your pc appearing as a networked Time Machine vacation spot doesn’t must be on on a regular basis. Nevertheless it does imply that pc, when it’s on, will spend extra of its energetic time performing backups, catching up for when it’s turned off.
- A Mac laptop computer can work completely nicely as a networked Time Machine vacation spot, however in the event you take it some place else, put it to sleep, or unplug it from battery energy, backups can’t happen.
- A sturdy community connection is suggested–that’s, join that machine through ethernet to your community moderately than depend on Wi-Fi. In case you use the latter, Wi-Fi works nice, however it’ll probably congest your community due to the excessive intermittent worth of backup knowledge.
Time Machine is strong sufficient that if it may possibly’t again up straight away, macOS caches information that should be backed up in the event that they’re modified between backup classes. Then, it performs an automated catchup, utilizing the cached backups on a person Mac to switch these to Time Machine.
Right here’s the way you get began with networking Time Machine backups; I’ll stroll via these factors after this overview:
- Get a sufficiently giant drive to retailer your complete potential contents of all gadgets in your community backing as much as it, plus 50 to 100% extra capability to retailer archives.
- Format that drive as APFS.
- Partition the drive if you wish to reserve particular storage for every Mac as a substitute of making a big pool for all Macs on the community.
- Utilizing the Sharing settings to allow Time Machine on the drive.
- Join from the opposite Macs to arrange Time Machine.
Get a giant drive and format it as APFS
In case you add up all of the storage required in your community and add 50 to 100% on prime, and it comes out beneath 2TB, you may contemplate an SSD for pace and quiet. The drive could also be operating some affordable proportion of the time, and in the event you or another person is working subsequent to the pc that’s the Time Machine vacation spot, you’ll hear an arduous drive (HDD) chugging away.
That mentioned, in case your complete wants are over 2TB, 4TB drives stay fairly costly (greater than twice the price of 2TB) and also you both wish to buy a number of 2TB drives or swap to an HDD. You will get extraordinarily high-capacity arduous drives (12TB or bigger) for a music nowadays. (I opted to get a two-drive system and use RAID mirroring in order that I’d have a second backup: every little bit of backup is written to each drives in case one fails. Yow will discover RAID methods from many firms, though they add to your value.)
APFS has been the popular Time Machine backup drive format since fall 2021 and I like to recommend utilizing it. Observe Apple’s directions to format your drive as APFS. It is a harmful course of, and you’ll lose any knowledge on the drive, so copy it off and guarantee you’ve an ideal copy earlier than erasing in that case.
Partition the drive
You will have the choice with Time Machine to both use one huge pool of storage for everybody and Time Machine creates particular person backup locations for every Mac, or you possibly can partition the drive and have every pc on the community goal a selected partition. I’ve seen issues (as have discussion board posters and readers) with the pooled methodology: Time Machine ought to routinely purge outdated snapshots as storage within the pooled storage turns into full, however it doesn’t all the time appear to acknowledge that it has to take motion.
Observe Apple’s instructions on APFS partitioning. Create a single container after which partition that container for the quantity you want.
Every partition devoted to a selected Mac ought to use the 50 to 100% guideline above for setting its dimension.
Arrange Sharing for Time Machine
I’ve discovered that utilizing the method Apple describes doesn’t all the time work reliably, the place sharing these volumes so anybody can learn and write to them allows Time Machine. As an alternative, I do the next:
- Create a brand new person on the Mac providing Time Machine backups. You may follow the instructions in this article. The person doesn’t want Administrator privileges. I named this person “Community Time Machine” for readability on my Mac.
- In macOS Ventura or later, go to > System Settings > Common > Sharing and click on the i (data) icon to the correct of the File Sharing merchandise.
- Drag every quantity into the Share Folders checklist. In flip, choose every quantity, click on the + button on the backside of the Customers lists, and add your networked person. Choose Learn & Write from the popup menu to the correct of that person’s identify within the checklist.
- Additionally, for every quantity Management-click/right-click the amount’s identify within the Shared Folders checklist and select Superior Choices. Allow “Share as a Time Machine backup vacation spot.” You may set a most restrict for backups, however it’s not essential in the event you’re utilizing your complete quantity for Time Machine.
- Click on Performed.

After including volumes, Management-click/right-click to entry Superior Choices.
Foundry
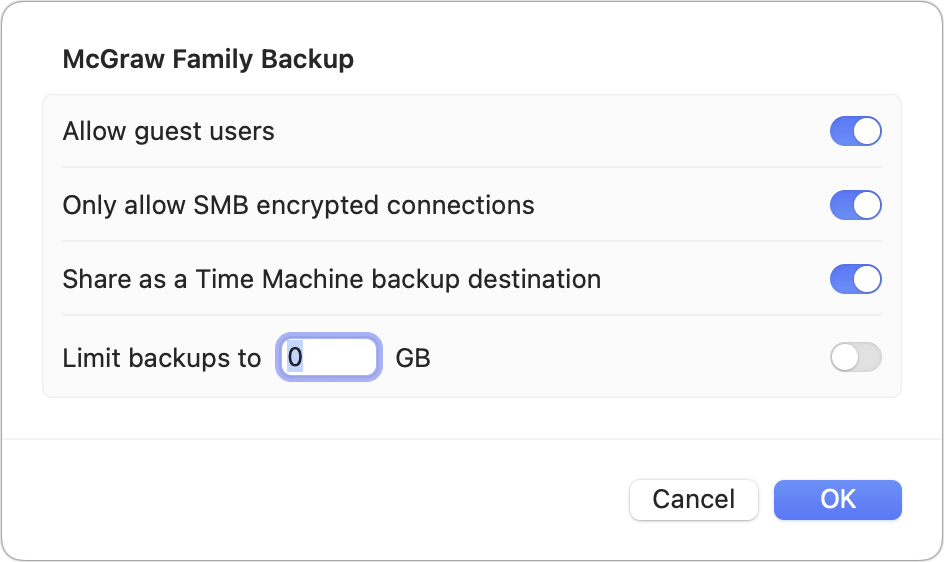
Use Superior Choices to allow Time Machine for the amount and to set a restrict, if essential.
Foundry
Now, from every Mac:
- Within the Finder, select Go > Community, discover the Mac, and log in because the networked Time Machine person. (This shouldn’t be essential, however I discover logging in first and storing the password within the Keychain when prompted helps forestall Time Machine backup issues later.)
- Go to > System Settings > Common > Time Machine.
- Click on the + signal so as to add a quantity. The shared quantity (pooled or particular to your Mac) ought to seem on this checklist. Choose it and click on Set Up Disk.
- Subsequent, chances are you’ll be prompted to log right into a person account, even in the event you’ve already linked to that account within the Finder or with Time Machine.
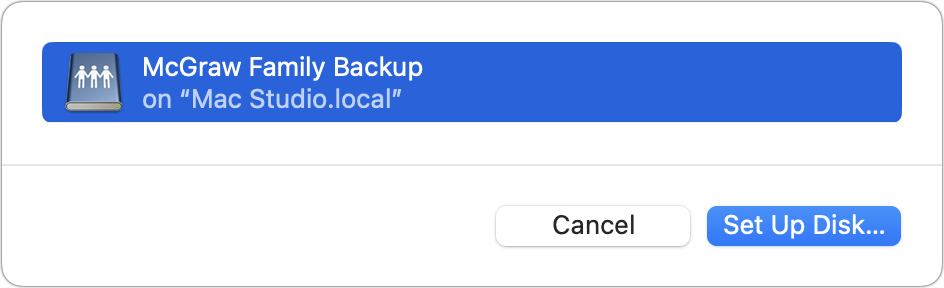
The networked quantity or volumes seems as an choice on different Macs, noting after “on” which Mac the amount is shared from.
Foundry
You may optionally use this course of to arrange encryption for the backup within the last step, which signifies that the important thing you select is the one approach to unlock it later. In case you select to encrypt your networked Time Machine backup, ensure you retailer the important thing in a password supervisor. There’s no different approach to unlock the backup, because the password is unrecoverable, even from the Mac that’s performing the backup to a linked drive.
This Mac 911 article is in response to a query submitted by Macworld reader Anton.
Ask Mac 911
We’ve compiled an inventory of the questions we get requested most continuously, together with solutions and hyperlinks to columns: read our super FAQ to see in case your query is roofed. If not, we’re all the time searching for new issues to unravel! E mail yours to mac911@macworld.com, together with display screen captures as applicable and whether or not you need your full identify used. Not each query can be answered, we don’t reply to e-mail, and we can’t present direct troubleshooting recommendation.


